Faux Finishing and Casework:
* Making your own faux-finish "wallpaper"
* Using it for covering casework etc.
* Beautiful finishes for knobs
* Samples and Applications
I figure the world needs more words about faux-finishing about as badly as it needs more words about cooking. A while back I got fascinated with faux-finishing and got a bunch of books on the subject. (My fascination with food and cookbooks is another story.) For a Tim Taylor type tool-freak to get all wrapped up with something that doesn't involve horsepower and RPM's and whatnot, was a little strange. But I did learn stuff. Here are some of the most important lessons:
Faux-finishing can be absolutely beautiful.
It takes the patience of a saint to do it the way the books want you to do it.
The books also want you can spend a lot of money you don't need to spend.
A little faux-finish goes a long way.
It can also be cheep, fast, easy, and VERY useful.
It can be cheaper, faster, easier and more useful then all the fancy wood finishing techniques I have learned and perfected painfully and expensively over the years.
The following cuts through all the slow, expensive, pain-in-the-butt parts of faux-finishing and explains how to do it to make drawer cases beautiful and have time before dinner to put all your neat stuff into those drawer cases. In a nut shell, you are going to make your own wall-paper and then use it to cover your cases, desktops, and use as accents throughout your project. Your home-made wall paper will be at least as elegant as the stuff you buy and easier to use and a lot cheaper too! Here's what to do:
Making sheets of FAUX FINISH "Wallpaper
NOTE:
This technique is one big happy accident. Not at all a bad thing, but plan on doing one or two experimental pieces to get started. You will need to decide what colors to use, how much, and in what order you slop them on. I'd suggest a piece 2 feet by 4 feet- before you do a big sheet. Do several until you get something you like a lot and have a feel for how to get it.
Step 1:
Get a big piece of some good old brown craft-paper. You can buy it in rolls 30 - 36 inches wide at the drug store etc. easily enough, but this paper is of questionable quality. I'd suggest you get it at a packaging store. They may want to sell you an entire roll -and such a thing will weigh 50 or 60 pounds and cost $50 or $60. Try to get them to sell you 100 feet or so of whatever they have on the roller at the end of their work bench 48 inches wide is ideal, but take what they have. I'd not use butcher paper. It is water-proof to some degree and we need paper the paint will stick to. (BTW -do they still have butchers where you live? I'm not at all sure they do around here and nor am sure about their willingness to sell you white paper, or their even having it for that matter.) If worse comes to worse, go ahead and buy your paper at whatever store will sell you a good sized roll of the stuff. You may need to prime it is all. We will come to this shortly.
Step 2:
Get yourself some assorted latex paints. In theory, you can make any color you might need with red, yellow, blue, black and white paint. It's not a bad theory if you have a flare with color, and not a bad theory in general if you are willing to let happen what may. I've had good luck with cheap paints that come in pint and quart cans at my local Big / Odd Lots -extra cheap store. This paint does not cover very well, but this is not an issue when doing faux-finishing. A degree of transparency is actually a good thing. The paint you have out in the garage for painting your walls is fine, but it's likely to be pretty bland and we are looking for vivid here. Unless you have specific ideal about the color you want to end up with, go ahead and buy the three primaries and the black & white. If, on the other hand, you are doing this all for a a little girl who's room is all pink and purple -then all you will need is red, white and just a little blue to make the purple. Do not skimp on some black paint -particularly if you are a man -or doing it all for a man. Shades of colors (colors mixed with a little black) are dramatic and ....may I say it?... masculine. I like shades anyway.
Step 3:
Gather some tools and find a work place. As to tools, all you really need is a couple of roller trays, rollers and a few of cheap roller covers. If you have some paintbrushes hanging around that you didn't clean as well as you might have wished, grab them too. Failing this, get some new brushes of a good size, but get the cheap ones. We aren't using them to lay down a nice even coat of paint, we are going to use them to splash and spatter paint about in a artistic, vaguely Jackson Pollock way. As to a work space, this kind is painting is not a messy as some projects, but it does involve paint after all. It also needs a flat & even surface. I use a 4' x 8' work bench, but I work with 4 foot wide paper. Let the width of your paper be your guide. Also let your back be your guide. Use the garage floor. Get knee pads if you like, but the good news here is that you are not going to be on your knees all that long anyway.
Step 4:
You are about ready to begin here. One last step before opening the paint cans. I want you to wrinkle up your paper. Yep, that 's right, wrinkle it all up and to a ball, or snake or whatever kind of mess you want. Be careful only to the point you don't tear it. Now spread is out on your work surface. It won't lay flat, but it don't make no never-mind.
Step 5:
Now it's time to start with the paint., but first, pour yourself a cup of...., or open a can of..... whatever. I promise you that you will be done fiddling about with paint before you cup of- is cold, or your can of- is warm. Pour your base color into the tray and start painting. Neatness does NOT count here. In fact, use the big paint brush to splash some of the complementary colors here and there and roll right over them. Spread both colors unevenly over the entire surface. Don't be bashful about using a lot of paint -it's the cheap stuff- and don't worry about getting it all even. What you want to do is get the entire wrinkled mess wet with paint. Now comes the fun part. Fold it over on itself -wet paint to wet paint. Smear it around. Wrinkle it up some more. Have as much fun as a baby squishing strained beets through his or her fat little fingers. The only thing you can do wrong is to tear the paper, but because the paper is now wet, it is also pretty flexible. And unless you got the cheap stuff, it's surprisingly strong. Open it back up. If you are using a big sheet of paper, it is helpful to have a helper. Kind of like folding sheets in reverse -easier with four hands.
One important CAUTION needs to be said about here. If you are using cheap paper, it may delaminate. You probably have one good fold-over-and-open-up-again even if you used the cheap stuff, but I'd fold a small corner over and see what happens If you notice that the paint has glued the faces of the paper together and there are chunks of paper sticking to where they don't belong, it's time to stop. Let the paint dry, and you are good to go. The paint acts as a great primer / sealer and you can now abuse even the cheap paper.
But let's suppose that you have good paper and there is no sign of delaminating. Carry on. Fold the paper back onto itself along it long axis, squoze it around and open it up again. I love doing this part -always fascinates me as to how dynamic, but how natural a finish begins to appear. It's quite likely that there will be a section the is too light or too dark or too something. Use this section to sort of stamp all over your paper. Then fold it some more. Try folding in each corner, or some other odd and random scheme.

One time, and I have to admit it was by accident, I folded it over as the latex paint was getting dry and thick. It made the most wonderful lizard skin like texture. This added to the wrinkles I put in at the very beginning and the wrinkles and mottles I put in as I was doing the painting. It made my absolute favorite sheet of faux-finish. I've tried to duplicate it a couple of times since then, and have come close, but never quite duplicated it. This brings up an important point. Accidents are often are good things. Let it dry overnight, and you are good to go. If you are particularly fussy, you might give it a coat of some sort of glaze or gloss coat. Or wait until you have put it on your object and then top-cote it. Or forget the whole thing and move on.
SAMPLES:
The following are scans of the leftovers of some of my favorite pieces. Unfortunately, a scanner can not show the textures very well and the textures are a large part of the appeal. I have included vague suggestions as to the colors I used for the BASE COAT -the relatively solid color I roll out over naked paper, the FIRST ACCENT -splashes and squirts I add while I am doing the first roll out, and SUBSEQUENT ACCENTS that I do during the folding part of the process. These subsequent accents need just a little bit of subtlety and I usually mix them up to be a relatively close match to the original color -often with a little white or yellow- and put them on with a brush.
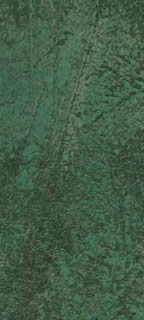
This is the lizard-skin like stuff I made by accident. I liked it so well, that I covered a bunch of butt-ugly literature organizers I use to store papers I really ought to throw out. And then I liked these so well that I went out and bought some more literature organizers and covered them too. Tres-sheik if I do say so myself.
BASE COAT: A rather basic green.
FIRST ACCENT: Black -but I always accent with black as you will soon see.
SECOND ACCENT: Truth to tell, I'm not sure I used another color here at all except green and black.

I made this to cover my desk-top and panel inserts for all the cabinet doors in my office. For the desk, I used the same technique I describe in Making Desks and Work Surfaces. (Some texture / wrinkles show up nicely on this scan.)
BASE COAT: Another basic color -this one blue.
FIRST ACCENT: Again, my favorite -a black accent.
SECOND ACCENT: White -with just a touch of yellow.
This is a pretty basic recipe for antique leather. 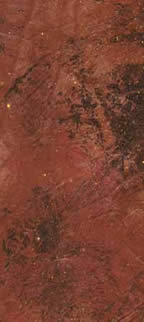
BASE COAT: Medium brown.
FIRST ACCENT: Black
SECOND ACCENT: Red (during the folding -and very little of it.) followed by spattering with yellow.
 This is a particularly dramatic effect and a VERY easy one. I'm not sure what to do with it, but for some reason, a turn-of-the-century brothel comes to mind.
BASE COAT: Bright red
FIRST ACCENT: Black
SECOND ACCENT: None.
The above appeal to me but may be just a little too dark for many people's taste. No matter, play around with lighter colors if this is the direction your taste goes. There are no limits and experimentation is cheap. I offer one small piece of advice. Figure out how a big a piece you need and then double it. And if you really like a particular piece, make another one as soon as possible so you don't' forget how you did it.
Using your faux-finish to cover casework:
NOTE:
I need to suggest you consider priming your case, particularly if you are covering one of my particle-board architectural cases. Before I do though, let me say that I rarely bother to do so. So why should you?
First, I'm pretty good at this and I work quickly. This means that the wood doesn't have the chance to soak up all the water and dry out the glue. If you doubt your ability to get it all down and happy quickly, a coat of primer will show things down considerably by sealing the particle board. (You also might want to have a plant-mister / spray bottle full of water to keep the glue fresh.)
Second, particle board swells up a little when it gets wet. I like the bumpiness this adds to the texture, but if you want something a little smoother, a coat of primer and a little time with some sandpaper will get you nice smooth finish. (And for that matter, if you want a real delicate finish, consider using something besides brown craft paper. Go buy one of the faux-finish books written by patient meticulous people and they will tell you how to spent hours and hours doing beautiful things with tissue paper, gold leaf, and other fussy techniques.)
Step 1: I should have told you to get a bucket of wallpaper paste when you were at the paint store. Oh-well -do so now, and get the heavy duty stuff. It's the same cost as the light-weight stuff and will glue all sorts of things together. I'm not sure you can find it as anything but water clean-up, but make sure this is what you have. If you don't have any more cruddy stiff old paint brushes, get a paste brush. Such a brush has thick stiff bristles, is cheap, and puts the paste on quickly. You will also need a SHARP (brand new) razor blade and a pair of good scissors. The sheet of faux gets limp when you put the glue on and tends to tear when you try to use a knife -no matter how sharp it is. Scissors don't do this. Get a plant mister / spray bottle full of water.
If you notice your glue is getting unenthused about being sticky and you still have a way to go, a spray of water will keep the paste co-operative. A large wet rag and some paper toweling are useful. Get a lot of newspaper. The only way to paste the sheet is to put it face down and work the paste from the middle to and over the edges. This means that each piece of faux-finish you use will require one or two sheets. A big old pin or needle and a soft squeegee will be useful and complete your tool kit.
Step 2: Plan your attack and cut the sheet to the size you need. Given the variety of objects you may choose to cover, I can't offer you specific advice. Just a couple pieces of generic advice. It's probably going to be easier to use a single sheet and wrap it around the case by rolling the object over the sheet. Unless it's not. For example- if you are covering something big, and then it might be easier to go with several smaller pieces. Point here is to plan ahead. Next, you might consider tearing the sheet rather then cutting it -particularly where an edge crossed a large flat surface where your fingers might notice an edge. If you doubt me, do this: tear a scrap of paper carefully. You will notice that it both tears and delaminates. This means the it tears diagonally through the thickness of the paper.
This also means that the edge actually tapers. And this, in turn, means that there will be one piece with a brown edge and another piece that is all paint. With a little practice, you will be able to tear the paper so that you get a nicely tapered edge ("feathered" edge is the pro's word for it). Given the wrinkly texture of your faux-finish, a torn edge will disappear more completely then a scissor-cut one. You might also consider tearing random pieces of your paper and gluing then to the object with the torn edged showing. This makes for a very appealing surface -lots of texture -easier to do -but it takes a little longer.
Step 3: Time to slop the paste on. What I usually do is to lay my paper out -face down- slop about half the paste on, roll me case onto the wet paper, and roll it again to get a second side covered. Then I smooth out the first side. You want to get all the air bubbles out. Don't worry about any wrinkles. Use you fingers or a soft squeegee to move the air bubbles to an edge. It you have a bubble too far from an edge, poke it with a pin and deflate it in place.
To proceed, I then paste up the rest of my sheet of faux and roll my case another 90 degrees, repeat the air bubble chore, and then roll it on to it's final side. I don't worry about fiddling with corners and edges etc. until I like all the large flat surfaces. If this seems to be taking a while, you might consider using the spray bottle to keep the paste you haven't gotten to yet all moist and happy. This is not quite wrapping a Christmas gift where you fold the paper back side to back side and them tape it down.
You will have to cut the paper at corners and fold it over on top of itself front to back. This means you simply glue the second fold down to the top of the first. It's likely you will find you have squeezed glue out to on top of the pretty part. Use your wet rag and paper towels at this point. Be just a little fussy about clean-up because even though it may look like it's all gone, the paste shows up as a haze when it is completely dry.
Go over it once more checking for bubbles. Add some wrinkles here and there to taste, and let it dry over night. Should be beautiful about now. As a final note, my case work is made carefully and with tight joints, but if you are covering something else -and it's a little beat up and it's joints are getting tired, the thickness of the paper will cover up a multitude of sins. For that matter, several layers of the stuff might hold the whole thing together for a few more years.
Beautiful finishes for knobs: The easiest way to paint little fiddly bits like knobs is to spray them. Find a cardboard box and poke holes in the bottom. Screw the knobs to the box but you only need to turn the screws in a little bit to keep your knobs from blowing away. Have at it. Remember two light coats are better then one heavy coat. You might consider just a touch with some fine grit sandpaper or medium steel wool after the first coat. Don't be lax about painting the sides of the knobs as well as the face. Or at least paint one side so you can turn this side up where it shows. If you want to keep with the faux-finish ideal, buy two cans -different colors -of the SAME formulation and combine them on the knobs. Don't be fussy here -you are looking for a little variation.
I'll contradict myself here and suggest that a bright vivid solid color is also a nice alternative to a multi-color subtle faux-finish.
I'd suggest spending the extra dollar for the high quality paint. But don't bother with metal-look spray paint. Don't matter how much it costs. I have never found a metal spray paint that didn't turn icky and bland in a few months. If you want a metal look -and this can be the perfect finish for an elegant drawer case, consider gold-leaf. Craft stores sell gold-leaf -or imitation gold-leaf- kits. Everything you need to put on a finish that stays shiny forever. More effort assuredly, but it can be done with the ol' feet up -and is definitely worth the effort.
Applications:
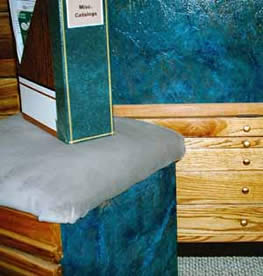 This is a corner of my office and I offer it to you as examples of what can be done. At the top left, there is one of those literature organizers covered with the green lizard-skin I mention above. I ran a yellow pin-stripe around the edges just for fun. Below this -lower left, is a cube case that I use as a piano bench. It has casters below and a fast and dirty upholstery job above. I store my sheet music in the drawers. But notice the side -it's the blue faux-finish from above, as is the cupboard door to the upper right. Very elegant to have various parts of a room covered with the same stuff. Finally, notice the knobs on the drawers to the lower right. This is the gold leaf I mentioned.
This file cabinet started life as basic butt-ugly sheet metal. I tore up scraps of the leather like faux from above and pasted them to the drawer fronts in a random pattern. You can see the edges throughout and the wrinkly texture in the upper right corner. I also gave it a gloss top-cote. I used a can of red and a can of black spray paint to paint the case. I did this wet-on-wet (a can in each hand so to speak) and the colors blended in a random warmish -brownish color with very little effort on my part.
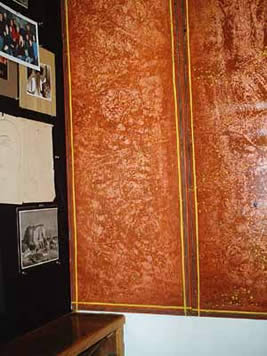 I have an awkward cupboard at the top of the stairs in my office. I made doors from a simple 1 x 2 frame and stretched old bed sheets over the frames. I then primed it with oil paint -and oil is entirely too much work -next time I'll use good 'ol latex.. Truth to tell, this was my first real (not-for-practice...) attempt at faux-finish and it took too long. I used what they call the "frottage" method where you paint on and then take off by pressing wads of newspaper and plastic grocery bags into the wet paint. I like the way it came out but it took so long that it led me to invent the fold-and-squish method I describe above. I finished it with various pin-striping and spatters in yellow and black.
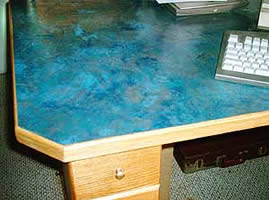 Finally, this is my desk-top. It is made from the same blue / green stuff I show above as an example and shown again to cover cupboard inserts shown it my first application picture. Notice the oak edging on my desk. (I describe this technique in Building Custom Desks & Work Surfaces. etc.) I also gave this surface and the oak edging a coat of a poly-urethane semi-gloss to toughen it up. It's about 2 years old and hasn't worn a bit.
My desk is a big "L" shape -about 5 feet wide and 9 feet long. Granted I saved money by doing it my self -the actual desktop is simple particle board, but I would hate to try to figure out what it would have cost me to use either formica, or -heaven forbid- actual leather.
© Bill Harvey March 2004