Home-Made Drawer DIVIDERS:
Lately a lot of folks have asked me about my making them drawer liners for the dwawer cases I build for them. I like to give my customers whatever they want -I take a lot of pride in coming up with the PERFECT design for their coffee-table, drawer case, or whatever, but I HATE this b'ness of drawer dividers. First there is the difficulty in communication.
"If there are 12 cells going sideways how deep are they?"
Do you mean deep or wide?
"Deep."
"As deep as you want them, but they can't be deeper then the drawer."
"Oh -but what about my mother's tiara from when she was Miss. Atlantic City"
"I dun'know. How high is it?"
"How high or how deep?"
"Who's on first?"
"No, Who's on second. What's on first"
…and so it goes. If my customer and I finally do sort out dimensions, number of cells, fabric, and a dozen other details, the dang linings end up costing more then the drawer. Still and all, I do understand the urge to do something to prevent a mess of collectable pens, jewelry, coins, knives, or marbles, etc. rolling around in the bottom of an otherwise lovely drawer like…. well…. like marbles.
My first attempt to help people in this direction was my article on Adaptable Drawer Linings. This was -and still is- a good solution for people who have at their disposal a table saw -or know someone who does. But I have come to find that not everyone has so basic a piece of equipment. (I have two!) So my task is to figure out how people might make themselves nice drawer liners -with raised walls -all softly cushioned in pretty fabric. And get'er done at the kitchen table with the tools from the bottom drawer by the kitchen sink -so to speak.
A brief outline of the procedure begins with cutting a board of some sort to match the bottom of your drawers. While you are doing this, give a little thought to the height and layout of your drawer liners. Then you glue little walls around the edges and throughout -where ever you need to divide something. When they are all glued up you are going to drape some appropriate fabric over it all. This covers up the unavoidable sloppiness of gluing in the walls / dividers. Also makes it beautiful and wonderfully cushy for your collection. Pop it all into the drawer, add your collection, and admire!
So here's what you do:

I'm using corrugated cardboard for both the bottom and the walls. The bottom drawer -about 5" deep on the inside- gets 3 compartments 2" high and one of the middle drawers gets 6 compartments 1" high.
Step 1
Cut something -almost anything stiff- to the size of the inside of your drawers -BUT MAKE THEM 1/8" SMALLER IN BOTH DIRECTIONS. And make a few extra for practice.
Here are some possible way to get'er done.
- Swing by the art supply / framing store and have them cut you some matt board -or better yet- plain old grey chip-board -the heaviest thickest stuff they have. They ought to be able to give you PRECISE right-angles and very accurate dimensions.
- Buy as big a sheet of brand new cardboard as you can fit in your car and take it home and cut it with a straight razor and yard-stick. This will involve some careful measuring, but can't be helped.
- Take your cardboard to a cabinet shop and pay them to cut it for you. Ought not take them more then a few minutes on their table saw.
- But if you are going to a wood-working shop anyway, why not have them cut you some hard board? 1/8" ought be good enough. Much stronger and ultimately easier to work with. And have them cut corrugated strips for the walls too. Cut at right angles to the corrugations. It needs to be strongest up & down and it folds easily as you glue it all together.
Step 2
Figure out what you are going to do about walls / dividers. You may also want to lay-out your items -especially if they are large and oddly shaped. Trace around them where you want the dividers to go. If you are simply doing little rectangular cells all the same size, it's a little easier, but you will need to lay out nice straight lines at nice neat right-angles. You will need to figure out how high you want the dividers and how much divider material you need. Up to you to do the measuring and the math and all, but here are a couple'a suggestions:
- They probably need to be lower then you think. Measure various items in your collection, with an eye to keeping them in one place -not in prison.
- If you have large and small items, in shallow and deep drawers, make low walls and high walls.
- If you are up to the challenge, make the rim walls highest, then the major divisions medium height, and the smallest walls -the one between the major divisions the lowers.
- And if you are really feeling confident -make curvy, angular, swoopy, circular, whatever compartments.
- You are going to need LOTS of the stuff you use to make the walls. More then you think, particularly if you have a lot of little do-dads.
- If you trace around an oddly shaped item, don't crowd it. Leave plenty of room for the fabric to do it's job.
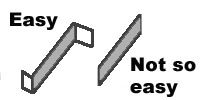
Remember -when it comes time to getting things to stand up while you are trying to glue them down, a little shape is a good thing.
Step 3
Get yourself something to make the walls / dividers -something with some dimension -some cross-section. And something that is easy to cut. Here are some possibilities.
- If you are working with shallow drawers and smallish items, soda straws work nicely. (But you will need adhesive rather then glue to stick plastic soda straws down. More on this is a minute.)
- Use a razor knife and straight edge to cut strips from foam-core. You can get this in the art-supply store but often it's available in the big discount stores too.
- If you have gone the route of getting help from someone with a table-saw -have them cut strips for you. Cardboard works well for dividers and is easy glue in. It's also easy to cut quickly and precisely.
- Hard-board -1/8" material like above. There is a product called "Hobby Board" I like, but it's sometimes hard to find, Do not get the tempered stuff. It's hard as can be and difficult to cut. You will probably want to have this cut into strips on a table saw, but you can cut it to length my scouring it several times with a razor knife and snapping it. I'd go to this bother only if you were making dividers 2" or more deep. And then I'd consider going with 1/4" material. Go down this path and you WILL need to use a proper saw to cut it to length as well as into strips.
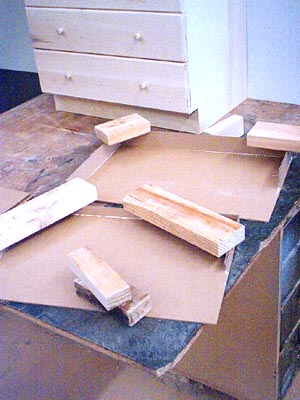
This is the beginning of the process of gluing the sides (rim) to the bottom. I uses 2x4 blocks, because I have a lot of them, but cans of tuna fish or books & magazines would work just as well.
Notice the glue in the corners. This is not sloppy work on my part, but what's called a fillet -makes things stronger.

Step 4
Commence to gluing your walls to your base. Here are some tips:
- Start by going around the edges and I'd do the corners first. This is because you can bend it into a corner and it will stand up by itself.
- Clamp it (weigh it down) with a can fo tuna fish or bag of beans or rice, any-dang-thing out'a the pantry.
- If it all starts getting vexations and annoying 'cause one piece falls down while you are fiddling with another, you are working too hard. Glue down one bit and set it aside.
- If you are all in fever to get'er done, move on to the 2nd one while the glue dries on the first one. An hour or less ought to do it, so by the time you have worked your way through all your drawers, the first one ought to be ready for the next bit.
- Wood glue is best, but good-ol Elmer's is very nearly as good. If you are using something plastic like soda straws you will need to use an adhesive. Adhesives look exactly like Elmer's glue, but stick non-porous things together. Ask for some at the craft store. They often have the words "tacky" of "craft" in their names.
- Corrugated cardboard glues nicely IF the edges are reasonably square. If they are not so square, use extra glue and take a little more care when you clamp things down.
- The fuzz that happens when cardboard is sawn actually helps! Use plenty of glue -it's cheap after all- but if you have glue slobbering all over the place, cutback f'rgoodness sake.
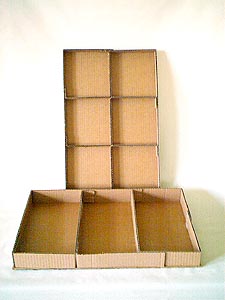
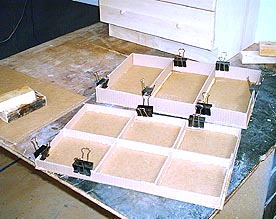

If you look closely, you can see I didn't get all hung up with keeping it all tidy and neat. No real need to/ The fabric will cover it all up. What is important, however, is the overlapped bits on the rim and the folded bits on the interior walls.

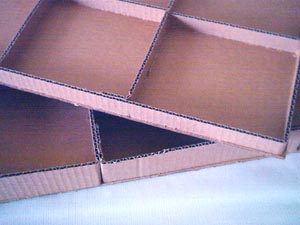
Here we see the gluing about done. Actually, the gluing is done -we are just waiting for the glue to dry.
After you get two or three sides up and the glue dry, the rest is much easier. I am using banker's clips to clamp things together while the glue dries, but big paperclips or clothes pins would work as well.
You might need to puzzle out what to put in and in what order. I did this as follows and this was based more on the length of the of my corrugated strips then anything else. Whatever you do, the trick is to have the earlier stuff help the later stuff. That and lots of overlaps and right angles.

You can see things a little more closely here.

Did I mention the corrugations on the walls need to go up and down? Two reasons for this: 1st., it is easier to bend them into nice neat right angles, and 2nd., then glue has a place to sort of soak in. In fact -for the smallest little dividers, (and there will be more of these then the larger ones -just the way the math works out), you will find that you might be able to dispense with the folded ends, simply cut the walls to the right length, put a little glue on the bottom and slip them into place. Then -and this is the good part, dribble a good sized blob of glue at the top of the joint and leave it alone. The glue will flow down both sides of the joint and a little will flow into the end corrugation. Easy. And strong!
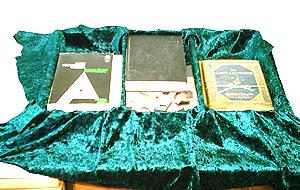

This is the 3 compartment liner right-side-up with the fabric in place and books holding it down. I'm using crushed panne-velvet -elegant if a bit garish.
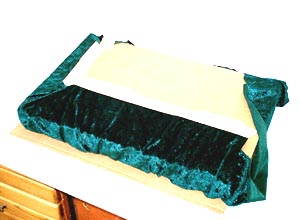
Good old masking tape is enough to stick the fabric to back of the insert.
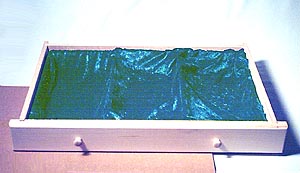
This is the finished liner in the drawer in the case.

Step 5
Do the fabric thing. Other then needing more fabric then you think you will need -this step is pretty goof-proof. Drape a piece of fabric over your dividers, tuck it under, and stick it in the drawer. Just a few thoughts to make life a little easier.
- Use limp fabric. It 'flows' into your little cubby-holes better.
- Buy gobs of fabric -more then you would ever guess you need. Thing here is that for the fabric to go into one hole, over the wall and into the next hole and so on, it has to travel a long way and so you need lots of fabric.
- Check out A Visit to the Fabric Store for some advice on selecting fabric.
- Don't get all carried away with neatness though. Let the stuff go where it goes and do what it wants to do.
- There is an annoying tendency for the fabric you have poked into THAT hole to come out when you poke it into THIS hole. Put your collection in as you go along or weigh it all down, Or dried beans work great. (Now getting them out afterwards….)
- Use masking tape to tape the edges to the underside of the liner if you want. This makes it easier to get it into your drawer, but isn't really necessary. Or use spray adhesive -easier in some ways, but more expensive, and if you are not careful with the over-spray -gosh awful MESSY!
- There will be some pleats and folds as you tuck it under. This is why you made the insert smaller then the drawer. Live with them and tape them down if you are doing the tape route.
- To keep the fabric more or less in place when you go to flip it all over, cover it with one of your other liners, hold onto it with both hands and then flip it.
Step 5 1/2
It may be that all you need is a simple padded panel sitting in the bottom of your drawer to finish things -'ticularly for a shallow drawer holding things that are not prone to rolling or sliding around. Nothing easier. Simply cut a piece of cardboard to fit the drawer. Cut out a piece of polyester or cotton batting to fit. (From the fabric store -it's the stuff used to make blankets all fluffy.) And cover it with your fabric. Fold and tape it down, drop in into your drawer and you are in business!