Do-It-Yourself
Adaptable Drawer Dividers:
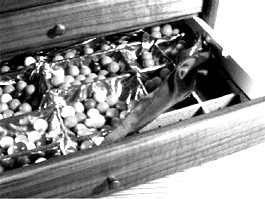
In French Lining Drawers, I dealt with a method of making customized inserts for drawers or shadow boxes to display your most valued collectibles with florist's foam and fabric. While this system is the last word in museum like elegance, it doesn't allow you to change things around unless they are all exactly the same size and shape. The following is a compromise between elegance and adaptability. What we are going to do is make some slot together drawer organizers, (drawer dividers) that you can sort of ‘tinker-toy’ together to adapt to your collection.
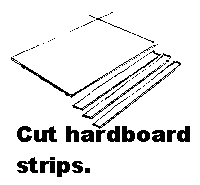
STEP 1
Start with a piece of hardboard, un-tempered -smooth on both sides would be best. You can get pieces of this material 2 feet by 4 at most of the home supply superstores, and two or so pieces this ought to give you a lifetime supply.
Next, find someone with a radial arm saw, a cabinetry shop for example, and have them cut you a bunch of strips 1/2 to 3/4’s of the depth of your drawers, shadowboxes, display cases or whatever. Then you want them to cut notches just a tiny bit deeper then one half the width of your strips. These notches probably don’t need to be spaced closer together then about twice the width of your strips. For example, if you decide on strips 1” high, space the notches every two inches, but this really depends on your collection. If you collect fountain pens, you might decide you want them every 1/2 to 3/4’s of an inch apart.
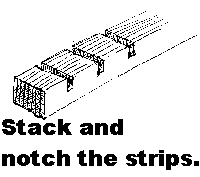
STEP 2
Have the saw guy use a thick blade or a small dado cutter so the notches are just a little wider then the thickness of the material. By the way, if you are having a cabinet shop make these strips for you and are paying their rate, you ought to understand that they are apt to want $50+ per hour, and at that rate, they darn sure ought not take more then half an hour to cut and gang-notch cut 20 or more strips for your drawer organizers. (Check out Hiring Carpenters and other useful things if this is new to you.)
With your strips in hand, stop at the fabric store and get a bunch of some appropriate fabric. If you read my article on French Lining Drawers, you know my preference for crushed panne velvet, and you know that I strongly urge buying twice as much fabric as you think you need. (I don’t understand why, but I always seem to underestimate the amount I need. Seems fabric is a different animal from lumber.)
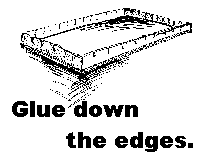
STEP 3
You might also stop at a frame shop and have them cut you some cheap mat board about 1/4” smaller then the inside dimensions of your drawers or cases. If you have some cardboard and a sharp knife at home, and are good at this sort of thing, do this part yourself.
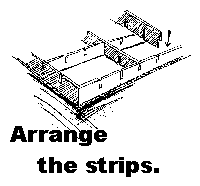
The first thing you need to do is to cut four strips to match the edge of your cardboard and glue them down to make sort of a tray. As to cutting the hardboard, I find that a pair of diagonal (wire...) cutters works about the easiest, but a pair of heavy kitchen shears, or really big toenail cutters might work as well. If you don’t have any of these tools handy, you can score the stuff several times with a sharp utility knife and snap the strips off at the length you want them.
Don’t worry if it seems a but tentative to glue edges of hardboard to the very edge of a piece of cardboard. Take your best shot, hold the strips up and in place with some soup cans or something, let it dry, and give it another shot of glue when the first has set up. You give things "another shot" of glue by smearing what's called a 'fillet' of glue into the corner. Yep, this involves actually getting your fingertips into the glue, but it washes right off. Let these puppies dry overnight.
STEP 4
Now the fun part. Set your cardboard tray in front of yourself, arrange a drawers worth of collectibles artistically thereon, and trace out where you want the drawer dividers. You don’t need to constrain your self to a simple grid. Have fun. Be creative. Remove your collection and start slotting together your dividers to match your layout. You can just snap the strips off at the notches by hand. Don’t worry if the notches don’t fall to the exact edges of your tray, in fact, make them fall short of the edges. Glue it all together only if you are sure you will not be changing things again, but the beauty of it all is that you can rearrange it if the need arises. The slots hold it together well enough without glue.
When you have your drawer organizers in place, drape a generous amount of cloth over the whole works and start poking it into the little spaces. Start at the middle and work your way out, putting your collectibles in as you go so they can hold the fabric in place. You now should be finding out why I recommended getting so much extra cloth. Going up and down into each space seems to go through a lot of cloth. Don’t worry about wrinkles, they can’t be helped, and extra cloth just adds to the luxurious look of the whole thing anyway. Find some way to turn the whole thing upside down, (Use an extra piece of cardboard to keep everything in place while you flip it all over.), and tape the extra fabric around and to the bottom of your tray. Flip it all back over, drop it into your drawer, and you are done.
MORE POSSIBILITIES FOR FRENCH LININGS
A few words need to be spent on real French lining, -made from wood even. If you have the patience and tools to cut a board or sheet of plywood, you probably know enough to get a good start. All I can add is to suggest is that you buy some blanket stuffing, Dacron is probably the best, when you are at the fabric store picking up your velvet or whatever.
Putting this down between your wood and fabric softens your corners and will save you some sanding or routing.
If wood seems just a little too hard to cut in one lifetime, Get the kind of foam that is used to insulate houses. It comes in all different thincknesses and will save you the bother of slabbing like you would need to do with the florist foam. Here is a tip, acetone -or lacquer thinner -or finger nail polish remover -both of which probably contain acetone, melt Styrofoam into nothingness. Cut your foam to match the size of your drawers or whatever, (and plan to mount it on cardboard like the florist's foam), lay out the shapes to match your collection etc., and just brush on a whiff of the acetone. Go slow till you get the hang of how much acetone melts how much Styrofoam, -if you have the good stuff, it will melt a LOT of foam. You will probably want to do a little hand work to make things just right. Cover it all with a single thin layer blanket stuffing and proceed with the velvet. Unlike the florists foam, however, your insulating foam is strong enough to forgo the need to drizzle glue all over everything.
Bill Harey