Easy Home-made DISPLAY STANDS |
|||||
Beginning Display Stands -Video #1
Advanced Display Stands -Video #2
So you say you have something that is special and beautiful but it just sort of sits there? Perhaps it needs it's own display stand. Here is an easy way to make something simple and EXACTLY the right size, shape and color.
I have a couple of nieces that are –what were called in my day- ‘jocketts.’ Athletic little things. (Pay close attention to US Olympic Swim Team come 2012 for the name Brandon.) But anyway, one of them decided she wanted to take up juggling –particularly the type of juggling that involves three cigar-boxes. Or boxes that look like cigar-boxes in any event. They have to be all the same size & weight, and as light and strong as possible. So it fell to Uncle Billy to make a couple of sets of rectangular boxes. Kind of a fun diversion from making drawer cases and whatnot. As I was finishing them, it occurred to me that they would make great little display stands. I’ve been pondering how the average homeowner might make such. Easily done if there is a wood shop and cabinet maker close at hand, but otherwise, perhaps not so easy. Well, hold on –I’ve come up with a means for a collector / hobbyist to make lovely boxes of any size from cardboard with nothing more then a utility knife, tape, and glue.
We begin with some cardboard. You can cut up what ever cardboard boxes you have at hand, but life is a bit short for this level of economy –in my opinion anyway. Entirely worth while to drop by the neighborhood truck-rental / packaging store and buy some new corrugated cardboard pads -flat -uncreased –corners intact -white -clean -and of a respectable size. (Bigger sheets are the easiest to work with and most efficient as far as waste goes, but you have to be able to be able to get it home after all. Two feet wide by four feet long are probably a good size.)
I lied a little about your only needing a knife. You will also need a metal straight edge. Framing square works well and is useful for making right angles. But a sheet of paper has 90 degree corners and you can get a cheap and effective straight edge by buying one of the aluminum strips they sell in home-center stores to hold down the edge of linoleum. Come about 3 of 4 feet long and cost all of a couple of bucks. I’d not try to use a yardstick –you want to slide a sharp knife along the edge and whad-ya-know? –knives can cut wood! Also, using half-assed tools is a great way to cut yourself .
So here is what you do:
Figure out how big you want your display stand to be. Width and depth. Write these numbers down. Now figure out how tall you want your stand. Multiply this number by 2 and add it to both the width and depth.
Step 1.
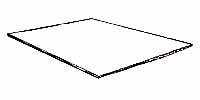 Cut out a piece of cardboard this size. This is about the only place you have to be careful and accurate. Use the framing square if you have one, or use a sheet of paper for right-angles, tape measure, and pencil to lay things out carefully and accurately.
Step 2
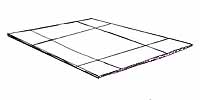 Now measure in from all four edges by the height you want and crease the cardboard along these lines. Use the straight-edge and the heal of your utility knife. Or a butter knife. Or you thumb-nail for that matter. You don’t want to cut the cardboard, but you want it to fold precisely where you want it to fold, and a good STRAIGHT crease is the way to go. If you do have a workshop at hand, rip a piece of hardboard to a width equal to the height you want for your stand. (I use one of those roller things that look like a little pizza cutter that folks use to install screens to do the crease.)
Step 3
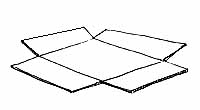
Cut out each Corner.
Step 4
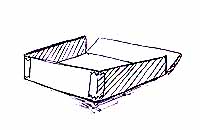 Follow the crease and fold the sides up. Masking tape to each corner holds it all together. Carpenters glue will add considerably to the strength but probably is not worth it unless it’s close at hand or you plan to put something heavy on the stand.
Step 5
The next step is to cover it with something to cover up the cardboard and tape and so forth. I am a big fan of homemade Faux-Finish, but any number of possibilities present themselves. Perhaps the wall paper that matches the room –or contrasts with that in the room. Or simply brown craft paper put on carefully –with wall-paper paste, allowed to dry, and then painted later. (Or Fabric, but fabric is just a little outside of my field.) I must stress that you are not going to get a fancy lacquer finish with this technique, but that’s OK, -you don’t want to make the base more attractive then the object on it.
You might want to give it a quick coat of gloss top coat. Be a little careful to select a topcoat that gets along with your color coat. Put some little self-adhesive felt pads on each corner and you are probably done.
Now if you have a particularly heavy object to display, or need to bottom to be closed for some reason, there are a few advanced techniques that you might want to consider. They add to the complexity, but can’t be helped.
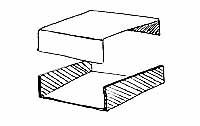
CLOSED-BOTTOM BOX:
Two ways to go here. You can either make two boxes -one a little larger then the other and stick them together. Think of it as a box and its full size lid. This will take a little trial and error to get size differences just right. The second approach is to make a single box that fits together like in the picture. But you WILL want to glue this one together. Use the masking tape to hold edges together till the glue dries. Either approach gives you a stronger box and provides the opportunity to glue felt to the bottom. Picture the whole works on a nice coffee table or something and the need for this finishing touch becomes clear.
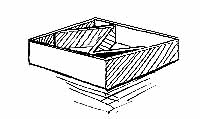
INTERNAL RE-ENFORCEMENT:
Don’t let this scare you –it’s easier then it sounds. Figure out how high the box in on the inside, and cut a long strip of corrugated cardboard this wide –but there is the tricky bit –cut it across the corrugations. This way you can fold the strip into a Z, or a square, or a spiral for that matter. Glue it into your box –just dribble glue to the edge of your reinforcement and stick it in the box. If you have make a two part box, you will need to measure carefully, and glue it top and bottom, but you may well end up with something strong enough to stand on. Not for nothing do people ship stuff all over the world in cardboard.
WALL MOUNTED DISPLAY:
 You are going to have to do this right –unless you are displaying teddy-bears or something that doesn’t mater if it hits the floor. On the other hand, if you do it right –this technique would serve to display fragile glass items graciously on the wall. (Provided you don’t live where there are earthquakes or kids.) Make a few open bottom boxes to get the hang of it. Then measure the inside of the box and cut yourself –or have someone cut for you a piece of wood. Half inch to three-quarters of an inch thick would be about right. Then glue the board into the bottom of the box. Glue is cheap and nothing wrong with using lots of it –except it tends to ooze back out when you set it aside to dry. Far better then lots of glue is a nice snug fit between the cardboard and the board and just enough glue.
When it’s all dry, cover it with your faux-finish paper, or wall paper, or fabric, or whatever. Put some felt on the "bottom" –the side that goes against the wall. Consider a label at this time if the item is particularly collectable rather then simply decorative.
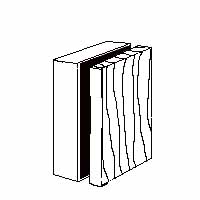
 Then drill a hole through the board at about a 45 degree angle. This is another part that MUST be done right. Too little ‘meat’ and you run the risk of the nail pulling through the box and the whole thing falling off the wall. On the other hand, if you drill your hole from too far back, the nail will be too short and it all hits the floor for different reasons, but it hits the floor none-the-less. Look carefully at these drawings and find someone skillful with a drill if you are not. For that matter, and especially if you have two or more nails (and for a wide shelf –this is probably a very good idea) it takes a little skill to drive the nails and have it all come level.


Note carefully these pictures. It is probably pretty intuitive as to how to make these things as strong as possible, if you are in doubt, try making a mock-up and see just how much force it takes to break it. Is apt to mess up the wallboard in your house, so run your tests in the back of a closet or something. All things considered, these are probably stronger then you might think, but you know the value of the item and you know how it’s apt to survive a fall.
A FEW PARTING THOUGHTS:
If you have a cabinet maker handy, you can have him or her make you some solid boxes out of 1/2 inch MDF. Then you can just sand your heart out and get as smooth and glossy and as fancy a finish as you want. Otherwise, use a little imagination on the subject of covering the box. The right fabric would be absolutely elegant, but I have no idea how to make corners and seams. Have a close look at my thoughts on faux finishing. Such makes for beautiful and easy finishes. What is more, gluing wrinkled / leather-look craft paper over a project covers a multitude of sins if your work is a little sloppy. Don't hesitate to go over it all with a nice glossy top coat of some sort.
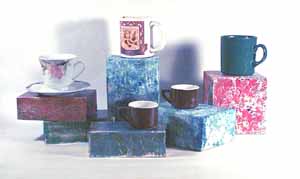
Notice my own personal collection of coffee cups below -not an impressive collection as these things go, but it serves to demonstrate scale etc. If you look closely at the boxes to the left of the picture below, you will notice they have an antique gilt finish. This is easily achieved over latex paint, with an iron (set at medium-high) and the stuff printers use to emboss gold into high-end printing. Comes on a roll of thin nylon film and they throw it out when they are have run it through the machine once, but there is often still plenty of gilt on it. Use the iron to set it onto the latex. It will not cover things like real gilding, but makes for a nice -and easy- accent. For that matter, if you want it to look like real gold -or silver, or antique gold, or pewter, -and are willing to spend the time and money, hobby stores sell gold-leaf gilding kits with all the fixings.
I made the the boxes below as follows. The set of small juggling boxes on the left were covered with leather-like faux-finish, gilded as mentioned above, and then given a coat of poly-urethane. The large blue one -part of a set of five -also for juggling -were made in much the same way. The large red one to the right was done a little differently. This is actually a set of cubes for my sister to display some lovely Sake-servers in her China hutch. I covered the cardboard in unpainted craft paper and let it dry. Then I gave them a quick coat of latex in the primary colors, and finished by sponging on cream and black. I mixed some drywall mud into both colors of paint to give them considerably more body. This makes for interesting finished texture. Keep the colors separate and combine them on your sponge. Except I don't have the patience to do real sponging so I used a wadded up plastic grocery bag and get it done considerably faster.
The extra effort putting little felt dots in each corner is well worth it. If your needs are fancy enough and you have the patience, a solid bottom and full sheet of thick felt stuck on the bottom is even better. Spray adhesive or rubber cement works best for fabric. (Carpenter's glue tends to soak all the way through and make the felt stiff and scratchy.) Once the paint is well cured, a spray of furniture wax is a good thing. A better thing is paste wax -but it's also more work.
© September 2005 Bill Harvey