SHADOW BOXES:
Enjoy a wonderful old fashioned hobby that does scrap-books one better.
You can easily showcase your heirlooms in classic shadow boxes or
other displays. Here's how.
HISTORY:
A hundred years ago -or there abouts, proper Victorian women had a lot of time on their hands. Some of them, particularly the very rich ones, had just a whole lot of time to kill. They hung around in rooms called "parlors" and "drawing rooms" and read, sewed, embroidered, maybe even did some drawing. And they looked through Sterio-Opticans. They looked at sepia toned pictures of the Taj-Mahal, or the wildly modern and trendy Eiffel Tower. Remember the View Master you looked through as a kid? White cardboard disks about 4 inches in diameter that you would stick into those do-dad’s that looked like toy binoculars. You could look at the Taj-Mahal or the Eiffel tower in COLOR!!! Both the Sterio-Optican and the View Master were high-tech, (for their day) means for looking at 3 dimensional reality.
The Victorian women, however, had a low tech way of creating a 3D reality that both killed time and didn’t require you to look through anything. They made shadow boxes -little tableaux put into display cases. Originally they were made from the popular art of the day and later came to be made of the sort of stuff that would come to be called "found-art" 100 years later. This is to say, they used real things that had been sitting around too long and got collected up and stuck in a box, -stuck artistically in a display cases, but still and all, mostly goofy old stuff that got stuck in'a box.
![]()
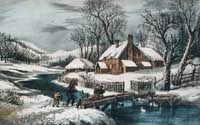
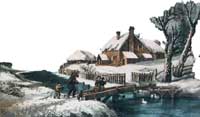
But to begin at the beginning, the ‘pop-art’ approach, (and remember this was great-great-gramma’s pop art), might start with three copies of the same Currier and Ives winter scene. Imagine a lovely winter scene of a family crossing a footbridge in the foreground, a snow covered house and barn in the middle distance, and hills with more snow in the background. Our Victorian lady would paste these prints to separate sheets of stout paper and mount one as the background. She would then take her best fiddly little scissors and carefully cut out the middle scene and paste it to a thinnish block and paste this block exactly over the same on the first sheet. Next she would cut out the foot bridge & family and paste it to another-possibly thicker block-and then past this scene over the middle scene.
The result would be a surprisingly appealing and realistic three dimensional tableau. Turns out that there is more art to such things than one might expect -not to mention patience involving fiddly little scissors. (Also turns out that there is absolutely NO WAY to illustrate it all on the computer screen.) The whole thing would be mounted in a picture-frame like thing, (a display cabinet or shadow box) with a deep space between the glass and it’s backing. The thickness and the various levels of forest, farmhouse, and bridge in our example produced shadows and hence the name, -shadow-boxes.
Around the turn of the century, it came to be trendy to make shadow boxes with real things. Often these objects were selected as symbols and a given box would have a theme, or a series of boxes would have a single theme and each box would be a component of that theme -the four seasons for example. As the popularity of the shadow-box hobby filtered down from the hoity-toity to the common class, the themes of the art, (and it was presumed to be art by the proper Victorian Ladies), -became less abstract and more personal. Imagine a young woman’s My Summer Visit to Cousin Emily at the Seashore, filled with her dried corsage from the cotillion, seashells, ticket stubs from the theater and whatever else she saved for the memories they held. Compare this to the proper Victorian woman’s Gifts of the Ancients, for example, containing physical representations / symbols of democracy, science, the arts etc., and you get the idea.
The young woman’s shadow-box didn’t presume to be art and had no lesson to teach. Indeed it had no meaning to anyone but the young woman, her family, and perhaps Cousin Emily. But it had tremendous value to her and undoubtedly gave her pleasure for years and years. Such shadow boxes were charming, innocent decorations that made a house a home by holding memories and meaning. Unfortunately, the very nature of the items they held, -cheap commercial paper -(menus, ticket stubs etc.), dried flowers, bits of cloth and what-not -do not last. You can see these shadow-boxes in the surviving photographs of the interiors of homes of the era, but they are rare otherwise. And this is unfortunate.
*If you get a shadow box with an acrylic pane as are the ones I make for collectors and hobbyists, some of this problem is eliminated. This is because plastic is opaque to most UV light -and UV is the light that does damage. Check out my article on Protection from UV Damage
Shadow Boxes for Kids
Making Shadowboxes in the 21st Century:
Shadow Boxes, Beginning Session from gotchavideos on Vimeo.
Unless you have a deep need to preach and moralize about the Gifts of the Ancients, or The Four Seasons, follow the example of our young woman from the working class and make your shadow box hold the simple memories that you and your family will treasure. Sort of a 3D scrap-book, but one that holds the good stuff. What sort of stuff is the good stuff though? Rather then describing every possible object, permit me instead to define these things in terms of your feelings about them. The very best things to put in your shadow-boxes are those things that serve no particular purpose, but which you just can not bring yourself to throw away. Ideally, things that relate to one another in some way or other, in short, -they are things that tell a story, or would help you tell a story, or remember one for that matter.
Pretend, for the moment, that you are sort of a cross between a prosecuting attorney and the advertising executive assembling an important case / campaign. You will need documentation, physical evidence, eye catching art, and finally, a message.
THE GOLF GAME:
Lets apply all this to a fr’instance. Suppose you have just finished your all-time best round of golf. Did you wad up the score card and toss it? Hardly. This is your documentary proof. Still have the ball you used to do it? Here is the physical evidence. Do you have a four-color glossy brochure from the club? There’s your eye candy. All that remains is your title / message. Your computer can’t print attractive, large, perfectly centered titles in a dozen or so fonts already? (One small piece of advice in this direction, -you are, after all, making a memento that will be doing its thing for years to come-- include the year.)
How Big? Lets continue with our example of your golf game. We have the golf ball, and three pieces of paper, -score card, brochure, and something with your name, the date, and some mention of what you did neatly printed. Kind-a dull so far. How to make art -or at least memories? First, you need to make a vague determination of to the size of your shadow-box box. (Sort of a chicken-or-the-egg problem here. Do you have all the stuff ready to go and now need to find the appropriately sized shadow-box? Or do you have the box all picked out and need to find enough stuff to fill it, -or edit because you have too much. For our example we will assume we have our items at hand and will lay out our display and thereby decide how big a box we need.)
In addition to determining the size of our display, we must also find a way to make it interesting. Each problem influences the other and the answer can be found in the same technologies used by our turn-of-the-century Victorian Ladies who cut out shapes and piled them on top of the other. In other words, make it 3D. This makes it higher, smaller, and MUCH more interesting.
Designing the Display:
Probably the largest thing in the bottom. This is apt to be the four color glossy brochure. Trim out the uninteresting bits2. Don’t worry if there is dull text. It can be covered up with the score-card or your title or something. On the other hand, if the name of the golf course is predominate and interesting, let it be part of the massage. Mount your score-card on a piece of press board3, -the stuff they use to make file folders works well. While you are about it, mount-up the title if you are using one.
Now you have your three of your four elements at hand, the last one being the golf ball. Here is what you do for this, the physical evidence. You will drill a hole through the bottom of the shadow box, stick a tee in the hole, and glue the ball thereto. (The size of this hole is critical. You want it to catch on the tapered tee at the right height, but more on this later.) You have all four elements ready for arrangement. This will help you determine the size of the shadow box you need. Conversely, if you already have your box and find that your arrangement is a bit puny for it, it’s a simple matter to spread things out. You might -for example- use a piece of Astro-Turf as a background, then install the four-color glossy off center and place the score-card and title partially off the glossy. If it’s still too big, toss in a broken club head or perhaps an old golf glove.
Putting it all Together:
As to some of the mundane matters of background, means of attaching things thereto etc. consider one of the following for the backer-board, -the board that fits into the box and to which you attach the rest of your collection:
FOAM CORE: Neat stuff. Easy to cut. Pure white or flat black but black is harder to find. If you can’t decide between the black and the white, go with black, -more dramatic and it’s apt to provide better contrast with your objects.
FABRIC COVERED BOARD: -any kind of cardboard, foam core, or hardboard. Whatever you can cut easily, -and any kind of fabric that you like. Have a look at crushed pane velvet knit, (the knit stuff is elegant and easier to use because it stretches.)
PAINTED BOARD: If you have done any faux finishing, or are of an artistic bent, you can do really wonderful stuff by using just exactly the right color or combination of colors. Two small suggestions. a) -use flat or low luster paints. b) -leave some texture in the paint and/or leave the colors roughly blended.
If you decide to go with the fabric approach, do this to hold it all together. Cut your backer-board to fit into the bottom of the box. Drill or poke two holes through both the backer board and the back of the shadow box. Do this about two thirds of the way up. Thread a piece of wire through both holes in the backer-board. In one hole and out the other. If you can’t find some wire, use the little covered wires that come with trash bags. (We call them "twisties" in our house.) The twisty needs to be long enough to extend through both the backer board and the back of the shadow-box and twist together. Before you attach it to the shadow box though, wrap the backer board in fabric and tape the edge of the fabric to the back of the backer. Then put it all together. You will be able to attach paper and light things to the fabric with glue or pins. Improvise.
If you have decided to use either simple Foam-Core or a painted board, you will still need to poke some wire out the back of the board and thread these wires through your shadow-box back, but you need to locate the wire carefully, -behind something that will cover it. Try this. Arrange your collection. Pick something large enough, towards the top, and as close to the center as possible. Drill your two holes there, and thread the wire. In our example, this is easy because you are using the large brochure in the background. The only problem might arise if you try to glue the brochure down over the wire, but if your 4 color-glossy is mounted on a piece of press board first, this isn’t a problem.
If, on the other hand, your collection is not so much large pieces of paper as it is smallish heavy things, you need to run your wire out the back per the above, and then run wire the other direction to hold whatever in place over the first wires. Only when everything is mounted, labeled, etc., do you put the backer-board in place, thread the twisty through, and twist if off.
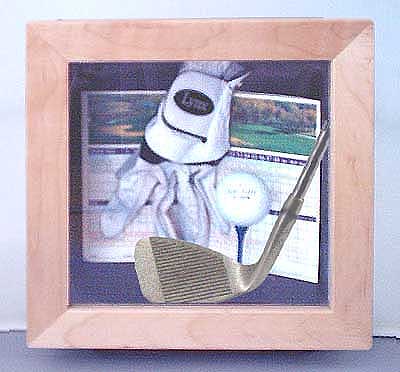
This shadow box -for example, memorializes a friend's all-time WORST game -as evidenced by the broken club. Linda sent me this picture on the condition that the score card would not show -legibly anyway. None-the-less, it gives her a giggle to have made it and display it in her study.
Returning to our golf example, you might decide to glue Astro-Turf to your backer board AFTER you have the twisty in place. The brochure is mounted to a piece of oak-tag and glued to the Astro-Turf is easily enough. (Don’t use glue on a thin piece of glossy paper -it will wrinkle it up.) The Foam-Core is great for lifting things up off the background, like the score-card and title. Cut the Foam-core substantially smaller then the thing you are gluing to it. All this cutting and gluing is easily done outside of the box -so to speak. The golf ball however, needs to be actually installed in the box, and it needs to be installed AFTER the backer-board and it’s items are in place, BUT it all needs to be fitted up BEFORE you wire-in the backer. This minimizes the possibility of messing up the paper etc. So as to drilling the hole for the tee, make sure it’s high enough that the ball shows over the frame. If the box is too small to get the drill and bit into the box, drill it from the outside.
There are about nine-godzillion kinds of glue, including Spray-Mount, glue sticks, carpenters glue, craft tacky glue etc. But if you absolutely positively need to glue any two things together -plastic, -glass, -wood, -makes no never-mind, you need to use epoxy. Epoxy or maybe hot-glue. Point is that you have to trade off strength, messiness, drying time, smelliness, porosity of the items etc. And remember this, -a large part of craftsmanship is having the patience to do it right, and this might mean that you have to leave it alone over night and wait till next morning to see the result of your labor in all it’s glory on the wall.
For advice on hanging it, check out my article on Hanging Things on the Wall the RIGHT Way
SOME FINAL THOUGHTS:
- This is one of those very rare instances wherein more is more. Baby boomers of a certain age grew up with The Golden Book Encyclopedia that our mothers got from the grocery stores, -one issue every month or so. The cover of each book had a beautiful illustration -a trompe l’oeil- actually a still-life of some of the things in that particular book. I used to be absolutely fascinated by these pictures and I suspect that many of us born in the 50's would remember these encyclopedia covers fondly. My point is this, the appeal of a shadow-box is the layers and layers of things for the eye to enjoy. (This does not necessarily apply to our example of the golf game, but this is for a specific instance.) When in doubt, go ahead and stick it in. Lift if off the background -use layers.
- Don’t hesitate to use cruddy old things. Clean them up and stick them in. Old things are cool. Cruddy things are problematic. Use paint thinner and fine steel wool. Often this -and some paste wax- is all that separates snooty antique store stuff from Goodwill junk.
- Check out Modern American Art of the 40’s and 50’s. Joseph Cornell, for example, made the shadow box an art form, -albeit a decidedly weird and vaguely disturbing art form. Alexander Calder -the guy that more or less invented the mobile -started out with these odd little sculptures made from whatever he found. And they are quite appealing, if a little confusing. Or Louise Nevelson who made these wooden assemblies that really weren’t shadow-boxes, but would have been if she had been a better carpenter. Consider Robert Rauschenburg. I have no idea what to say about him, but he did some neat / weird / compelling / what-the-heck-izz’it? / "I-may-not-know-art-but-I-know-what-I-like" sort of stuff. As it is, I like Ruashcneburg. Do this, just stroll through a art history book -the Beat Generation, British Pop, and a little 60’s Funk Art for good measure, and ask yourself if you can’t do about the same thing. Or have fun trying.
- Ignore all of the above and glue interesting things together in whatever way pleases you. If they are good things, use hot glue -which comes off relatively easily so you can take them apart and re-glue them if the spirit so moves you.
- Have your children gather up all the junk they are proud of -but is eternally cluttering up their rooms, and make a 3D scrapbook. Or have them do it.
- If you have a very large -and very flat- collection, you might find that my Jersey Cases are just the ticket.
- If your collection is even bigger, have a look at my Architectural Display Cases. I can help you design an entire wall of shadow-boxes.
Footnotes:
1. If the story they help you tell is not strictly speaking accurate, the items you will save might serve to make the story all the more believable. I take no moral or legal position on this sort of thing, but arguably the best stuff supports the wildest stories. Conversely, the tallest tales need the best proof. (Think of the American traditions like Paul Bunion and his Blue Ox, or Pecos Bill, or any story -for that matter-that starts out, "Once upon a time...." or "This ain't no s---").
2. Trimming glossy paper is not difficult, but there are a couple of tricks to make it easier. 1st -use good tools- (a good first rule for almost any activity)-- an absolutely sharp single edge razor. Use a new one if you have any doubt as they cost all of 10 to 20 cents. Also use a good straight edge, -something made out of metal. I use a $4.00 aluminum strip that the home-center stores sell to hold down the edge of linoleum. If you find there is an objectionable crease down the middle of your photo, you can try ironing it between two pieces of absolutely white paper with your iron set at a moderately high temperature. If the crease is still objectionable, cut it out. Use the straight edge to make a clean cut a tiny fraction of an inch on either side of the crease and paste both sides to a new sheet of paper. Generally the missing strip is less noticeable then the crease. Then, to put it all back together......
3. ... use SPRAY-MOUNT. This is very useful stuff if you have some and know how to use it. But it's also expensive and messy, so if you aren’t so skilled and/or don’t have any, a nice fresh glue stick is almost as good.
4. Literally -"fool the eye" Highly realistic illustrations or paintings.