How-To Line Drawers with Fabric:
I have to begin with the admission that I am simply not good with fabric. I've had customers ask about my lining the drawers I make for them with fabric. I certainly understand the impulse. Respect it even. But if I have to work w/ fabric, inevitably I also have to lots of bad language. This puts my mortal soul at risk for an eternity of perdition. And I ain't any too comfortable in this direction -even without the bad language- to begin with.
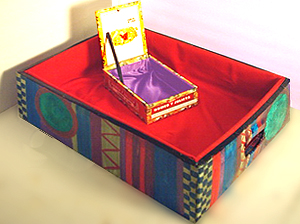 Here are examples of two extremes of lining things. The big one is a banana box made into a tote, (and a future How-To article), painted up all fancy and given a fabric lining. The smaller is a cigar box* -also tarted up- and given a purple satin lining. Same technique for both and given that drawers are of a size between these to samples, adequate proof it will work for your drawers & collection.
*Neptune Cigars is a nice company that will sell you empty cigar-boxes.
First thing I do in these circumstances is suggest one of the Do-It-Yourself techniques I write about in my Customer's Scrapbook. Check out...
Easy Home-Made Drawer Dividers for your Collection.
French Lining Drawers: (a perennial favorite -and the absolute last word in museum like elegance)
NOTE: If this seems a lot of reading to do -you are right, but I assure you that putting fabric into drawers -or totes, or cigar boxes, or any-dang-thing however you do it- is going to take enough of your time to justify your time spent getting yourself all well-informed.
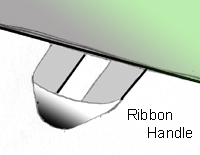
But to resume, I hope my customers get excited and decide to do it themselves. I even cut cardboard for them to make it easier. If they still want me to do the lining thing, I suggest a simple flat insert covered with padding, fleece, and even a ribbon handle. This is the same thing I do for coffee tables. (But more that a few of my coffee tables are for sea-shell collections and my customers put sand in the bottom of the coffee table's display.)
Recently however, I was not able to dissuade my customer from lined drawers. So spent some time figuring out how to take as much of the fiddly frustration out of working with fabric. Turns out there are some ways to get'er done. I don't claim say this technique is EASY -just easier and makes for a real nice result.
What you are going to do is to carefully cut the fabric all carefully, and glue strips of cardboard to the back side of it, and then glue in into the rim of your drawer. I think this is a little like what upholsters do when they close up a couch. Let me offer some general good advice for dealing w/ fabric -some of it good advice to consider before you take up any project you want to wrap-up in a good and workman-like manner.
Use good tools. For fabric, this means good scissors. Broke down and bought myself a pair of the good ones, and this simple step cut way down on the bad language.
Besides good scissors, other tools you will need include:
-
Iron and possibly a mist-bottle if you are using recalcitrant fabric.
-
A tape measure.
-
Something that will mark your fabric. A pencil probably will serve for most fabric -particularly heavy light-colored fabric. Chalk or a sliver of soap (?!) might serve if you are using dark fabric. Be a little careful of felt-tip pens etc. Make sure they don't bleed through your fabric.
-
A square of some sort.
-
A straight edge -especially if you are doing a big drawer &/or are not good at straight & square.
Have a large, flat, well lighted, de-cluttered work-bench. Maybe one you can use a knife on, and (better & better) an ironing surface. I draped a big beech towel over one end of my work bench and it worked great. Fabric needs to spread out. Room enough to do so leads to MUCH reduction in the bad-language.
MATERIALS:
Fabric. See above for advice on selecting fabric. It's a complicated subject -at least for me- but I can boil it down just a little. Velvet is elegant -but don't use it with silver -real bad things will happen to the surface of your collection if you use poly velvet. Use tarnish cloth from either Fifield Fabrics of Gaylord Brothers. Ain't cheap, but your silver collection ain't either. For real valuable stuff that isn't prone to tarnish, the museum people use unbleached muslin as a default. A little dull and if you decide to use colorful printed fabric & all, stick w/ 100% cotton. Check out something called 'polished cotton'. Fleece is nice -all soft & cushiony, but it's apt to be poly of some sort, but 100% cotton fleece can be found. Problem w/ fleece -either poly or cotton- is that it's real thick and you are going to be folding it all ever' which-a-way. If you are lining big things -like banana box toted, fleece might work.
Cardboard. Again, it depends on how big a box you are lining. For the big things, corrugated cardboard strips 1 ½" wide and cut parallel to the corrugations will serve. For a little jewelry box, poster-board (aka 'pressboard' or 'chrome') will serve.
Glue. Kind of a loaded subject, glue. I occasionally use hot-glue, but for this project, I soon discovered you need to use the high-temp stuff in a high-temp gun. Sticks quickly, but don't necessarily hold. I am more comfortable with good old wood-glue, but this might be just me. I use the stuff every day. It needs to be clamped and let dry, UNLESS you have an iron at hand. And surprise -you will! Depends on the thickness of your fabric, but chances are you can brush a thin diluted layer of glue onto your cardboard, fold over the fabric, iron it down and end up with an instant and strong joint.
PROCEDURE:
Prepping the Fabric: In general, you are going to make a fabric insert tailored to your drawer. The trick is to have cardboard inserts glued to the edges of the fabric that are in turn glued to the inside rim of the drawer. This makes for a nice even edge with NO SEWING. Yea!
The long sides of the insert have flaps that sort of fold into the corner and make for pretty while the short sides have a neat folded edge that just fits into the corner over the flap. If this confuses you, don't worry. Confuses me too. Soldier on and it will all become clear.
The most important trick to cutting frustration down to a minimum is careful measuring, marking, and cutting fabric. (Remember my advice about good scissors, a big work surface.) Ironing your fabric out flat will help too. But beyond this, I can only refer you to my the following pdf's. Pictures and all are the way to go. But just a few words on cutting the cardboard to length. The thicker the material you are using, the smaller you need to cut the short pieces. For example, if you are using corrugated cardboard, the inserts that go on the short ends, need to be ½" shorter then your measurement. For poster board, 1/8" will be enough.
Enough words. Open & print the following and commence to measuring, marking and making. Check back when you have your insert glued up and ready to put it in your drawer.
Fold it all up Before Final Assembly:
If you have done all the above ight, you have something like this....
...and if you don't, keep on keeping on and you will undoubtedly figure out what you need to do differently. (Did I suggest you practice on something besides your best and most important?)
Drop it into the bottom of your drawer and begin with one of the long sides. Make sure the flap is out and against the other side. Line it up with the top of the side, tip it back a little and run a generous squirt of glue along the strip. Press it against the inside of the side and line it up all pretty. (If it sticks up too much, the drawer might not fit back into its slot, so be careful.) If you are using hot glue, you will need to hold it in place to 20 seconds of so. On the other hand, if you are using glue, you will need a longer-tern solution.
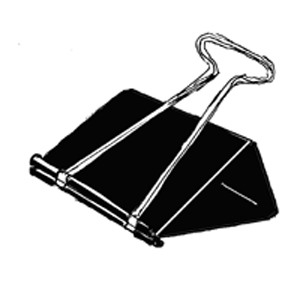
I LOVE bankers clips for this sort of thing. Big ones cost about 30 cents each.
Do the same thing on the short side. This is where you will find out if you shortened the cardboard strips to the proper length.
Done. After all the fussiness measuring and cutting, the actual installation is just this simple. Ain't it always this way? A little prep makes for an easy job.
Admire.