Displaying A Knife Collection
Arguably knife making is mankind's first art. Beautiful things, knives. So beautiful that they deserve a special display. With one of my cases -or one of your own- you can build a custom museum piece. Or for the collection that wants to be tucked safely away in a drawer, French lining drawers is a great approach.
Two things come to mind when we ponder displaying a collection of knives. First, knives are absolutely beautiful. They want to be seen. Second, they want to be handled. Do you remember those tests they used to give you back in school? See if you can fill in this analogy….
BEAUTIFUL is to "wants / needs / deserves to be seen"
as
______________ is to "wants / needs / deserves to be handled"
I can’t come up with one or not one that doesn't sounds dirty anyway. Whatever word you pick, a good system for displaying knives would allow them displayed as well as taken down and handled.
The final issue is one of safety, if a knife is mishandled, it is either going to hurt someone, or ruin it‘s edge, or both, -and I know collectors that take the view that the later is the greater problem.
The good news it that knives are roughly the same size and shape, -except for pocket knives –called ‘folders’ in some circles. If you collect both kinds, how do you display them both? I don’t know. Do you display your regular knives and store your folders away in a nice drawer chest? I don’t know that either. Here is what I do know. If you store your collection in drawers, both French Lining Drawers and Adaptable Drawer Linings are great techniques.
One warning, if you follow my advice re. French lining your drawers, you must –MUST make absolutely sure that the glue you use has COMPLETELY DRIED or you will have made a wonderful thing to automatically and easily rust your knives.
But what about the collection that you want to display rather then tuck away safely? Well, you could simply leave then scattered artistically on the mantel, windowsills, stereo, piano etc., but this is apt to get them dusty and the issue of safety comes to mind. (And truth to tell, I’ve met more then a few spouses that take the opinion that the marriage might last longer if there were fewer knives on the windowsill, -but I have no advice for you in this direction.) Putting them on the wall solves some of the safety problem –provided you hang them correctly. This might be the way to go for the largest knives and swords, but still leave something to be desired. The best way to go is probably to put them in a display case on the wall. (A display case on a flat surface is also a good way to go –just takes up more room.) So here is how to start with a display case –one of mine or any display case for that matter and make your own…..
CUSTOMIZED DISPLAY CASE:
These ideas are really just SHADOW BOXES taken just a step farther and adapted specifically to knives. May be worth a review if some of what follows is the least little bit confusing. My advice is based on the assumption you have a box shaped display case at hand that is the right size and shape etc. It has a door or removable window of some sort. Goes without saying that you have your knife collection all set, but just a word or two of advice here. If you are making a shadow box out of a broad collection of interesting but relatively unimportant items, more is more. The example from my article on SHADOW BOXES is a child’s summer vacation and such a collection might involve seashells, movie tickets, post cards, dried flowers etc. In short, souvenirs and knickknacks, -NOT collectable knives. With valuable and unique items, less is more. If you find yourself trying to jam your knives into a given box and it’s not working, it’s probably not working because the case is too small, or your collection really needs two boxes, -perhaps one case for WWI knives and another for WWII? If you want your collection to look valuable and professional, LESS is MORE. (If you are wondering if I am simply trying to sell more cases, remember that I suggest that MORE is More for shadow boxes.) So anyway, that said, here are the steps to building your own customized knife display case.
- Nail down your design.
- Gather up your tools and materials.
- Select and cut a backer board.
- Drill holes in board per your design.
- Upholster the board.
- Add shelves for folders and hangers for straight knives.
- Attach case to wall.
- Put it all together.
#1 Nail down your design.
 This means arranging your knives appropriately as they will show up in the case. Start by measuring the INSIDE of your case and draw out a similar rectangle somewhere. If you have the backer board at hand, cut it now and use to arrange things. If you put the backer board into your case and then arrange you knives, (and this is a good idea because it allows you appreciate the effect of the frame), consider skipping ahead to #5 Upholster the Board and install a temporary ribbon tab handle now. This is so you can get it out again!
Do you want to label each knife? Or perhaps a single card that identifies the entire collection. Appropriate identifiers are a hallmark of a valuable collection and an are easy way to distinguish your collection from just a "bunch of interesting old things." Faux finishers use strong tea or week coffee to artificially age paper. Use a clothes iron to thoroughly flatten it out again and then run it through your computer’s printer.
The only tricky bit here is figuring out how you will support or hang your knives. The simplest possible solution –particularly if you collect folders- is to use little brass cup-hooks. the only problem is that when you hang the
knife on the hook, it lays on it’s back, rather then it’s more interesting side. Here is what you do. Use a pair of pliers -two pair actually- to bend the tip of the hook up. This is to say "up" when the hook itself is flat. This is to say -bend the hook up -or perpendicular- to the plan of the hook the way it came from the store. ( Then when you screw it into the backer-board, turn it in so it goes down-hill with the part you bent going up-hill. Sorry -this is one of those things that is simple in real life, but difficult to do explain on a web site.)
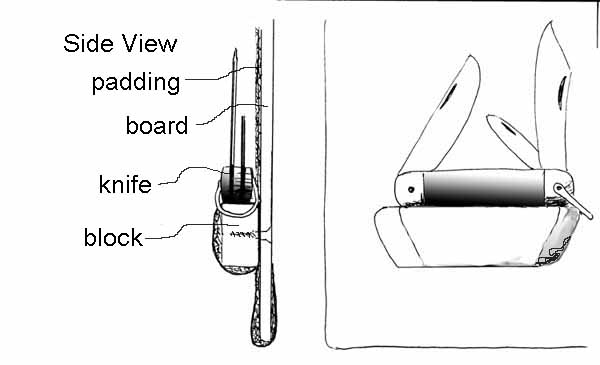
There are a couple of other possibilities for folders. You can simply make a little shelf out of a short piece of wood. Sand it down a little to round the corners, but don't get carried away. A piece of pine molding will do the job and is easy to cut and sand. You might make a long shelf and place a number of knives, or a single little shelf for one knife. Don't hesitate to make interesting shapes or angles. A simple plumber's PVC saw will cut pine every which-a-way you might need it cut -angle wise. You are going to wrap it in the same padding and same fabric you use to upholster the backer board and this will soften up all rough edges. Pad the front, ends and bottom of the block -NOT the top. The fabric will hold the padding in place and -with no padding on top- make a nice shelf to put your folders on their backs. Then, after you have upholstered your backer, you simply screw it in through the back with short wood screws.
So what to do with regular knives -the kind that don't fold up? Especially given that you want be able to take them down and hold them? There are about a hundred ways to do this. First, consider a locking cotter pin. A good hardware store will have 3 or 4 different sizes.
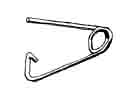
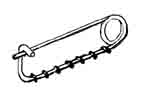
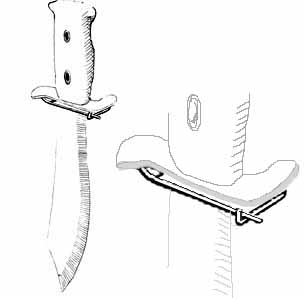 As to attaching them to your backer board, do this. After the board is upholstered and drilled, stitch them down with some soft copper wire. Do it carefully -with even stitches- and it will look elegant. Tie the wire back on itself with a simple overhand knot.
Once you have the safety pin attached, you can safely hang you knives and yet remove them easily when you want to handle them. If your knives do not have hilts, it is still likely that you can find a pin that will support them. You may have to bring several home from the store, but they are cheap.


What to do for bigger knives or even swords. Have a look at the knobs you can buy for drawer pulls. Depending on the age and ' rusticness' of your sword -a hardwood knob may be just the ticket. And wood will not damage the edge. For smaller or more delicate knives, little brass knobs may be the ticket.
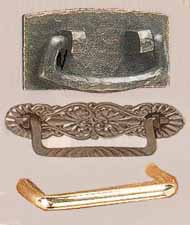 Here is a final possibility -one that has the advantage of a huge variety, but the disadvantage of making it hard to remove the knife of sword. Use a bail type drawer pull. Your hardware store has about a million different sizes, styles, and finishes. They are easy to install -if you are using a reasonably stout backer-board. You may have to shorten up the bolts that come with the pulls, or just buy a little bag of the appropriate size machine screws while you are there. These three, for example, go from a rustic Gustav Stickley that looks like hand wrought-iron, to a classic -if ornate- Victorian, to the final one -a simple contemporary polished brass. Your collection -its history and glamour- will dictate the perfect look.
Once you have figured out how you are going to attach you knives -both folders & straight blades and figured out how you are going to label them, you must give some thought as to how you are going to keep the backer board AND all your valuable knives- in the case. The simplest is to glue a lip of some sort into the top of the case. Something as simple as 6 or 8 inches of a 1/4 x 1/4 stick would do it. To put the board in, you simply put the top in first and then slide the bottom in. The weight of the board and knives keeps everything in place.
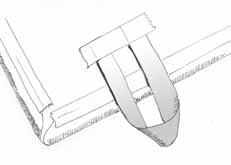
You must, however, add a little ribbon handle at the bottom so you can get it out again. Use wood glue and masking tape -to clamp it down till the glue dries. Be sure to leave room for the upholstery step later.
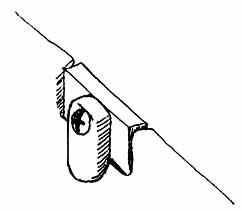 A slightly more sophisticated -but not necessarily better- solution is to make a little rotating tab that holds the top in. This is a simple matter of cutting a small rectangle out of your backer board -you might want to cover it with fabric, but I'd not use padding- and them whittle a little wood tab thingy. Glue in the square, but use a screw or flat-head machine screw to hold the tab and make sure it can rotate.
#2 Gather up your tools and materials.
 Do you have unfinished projects sitting around for want of a single doodad you neglected to bring home from some store of another? The difference between an enjoyable & efficient project and the incomplete one cluttering up the garage is often a matter of preparation. And while on the subject of preparation, have you cleared out a good work space for yourself? Trust me on this, if you are constantly pushing something out of the way or hunting for something that you just laid down in a pile of clutter, the project is no fun. Do you have at hand a cup, can, or glass of an appropriate beverage? If you need one, do you have a helper lined up? A few minutes spent in preparation for any project is apt to pay off many times in the doing of the project.
Your particular list of tools and materials will depend on exactly how you design the whole thing, but this ought to cover it:
TOOLS:
- a saw appropriate for cutting a wood backer board
or
- a utility knife for cutting a cardboard backer -life is too short to use a dull blade, get a NEW one if you have any doubt. (And who am I talking to –knife collectors?)
- scissors –for cutting fabric
- drill –you got to love those rechargeable ones that come in a case with bits, driver, and sockets included
- drill bit –if you don’t have a whole set –get one in the neighborhood of 3/16 and maybe a 1/16 inch twist bit
- tape measure or equivalent
- framing square –a useful thing but you can use a big piece of paper and a straight stick as a straight-edge if you don’t have one
- wire cutter and pliers or a needle-nose pliers with cutter
MATERIALS:
- backer board -I go over your options below.
- padding
- cover fabric
- masking tape –the wide stuff makes life a little easier
- wood glue
- pine molding for shelves for folders
- things to hang the knives
- copper wire for safety cotter pins
- ribbon for handles as necessary
or
- whittling wood for rotating tab
#3 Select and cut a backer board.
First off you need to decide between wood or cardboard. Wood is best but harder to cut. Cardboard is easier to find and cut, but too flimsy for any but the smallest display. My preference is toward 1/8 inch hardboard, There is a product called Hobby Board that is smooth on both sides. If you don’t have a table saw at hand, you can have them cut it for you at the home center store. Failing this, you can score it with a sharp utility knife (score it several times) and snap it in two. From the least to the most, your options map out as follows:
Possible Materials for the Backer Board:
Mat Board
- finished appearance
- available in many colors
- easy to cut -the framing store can cut it to exact dimensions
From the art supply store.
- flimsy –appropriate for only small collections of small knives in small cases
Corrugated Cardboard
- cheap
- easy to cut and pierce
- easy to fabricate into shelves for folders etc.
Small pieces are available everywhere –large pieces may require a trip to a packaging store
- flimsy –appropriate for only small collections of small knives in small cases
Foam-Core
- easy to cut and pierce
- the black stuff may be attractive enough to go without upholstery
- easy to fabricate into shelves for folders etc.
From art supply store or office supply store. White board can be found in drug stores or super stores, but black is harder to find.
- flimsy –appropriate for only small collections of small knives in small cases
Door Skin
- relatively cheep
- easy to cut (score and snap works in a pinch)
- made from mahogany veneer so you can finish it to a beautiful hard-wood appearance
From the lumberyard or home center store.
- stronger –appropriate for a medium sized collection
- tends to be splintery if not cut correctly
Hardboard
- strong –this is apt to be as strong as you need it to be for any size collection
From the lumberyard or home center store.
- needs to be cut and drilled correctly –HobbyBoard can be scored and snapped to a pretty good edge, but regular hardboard or pegboard needs a saw.
- both materials need a drill to be pierced, (but not pegboard)
Peg-Board
- almost as strong as hardboard
- it’s pre drilled in a nice neat grid for hanging things in a well ordered manner. (Consider the "Align to Grid" command when you tidy-up your computer desktop.)
From the lumberyard or home center store.
- needs to be cut correctly with a saw
Hardwood Plywood
- strong
- can be finished as fine hardwood
From the lumberyard or home center store.
- expensive
- needs to be cut carefully with a sharp saw –makes splinters otherwise
- needs a drill to be pierced
Cut your backer board to match the inside of your display case. Make it about 1/8 inch smaller then the inside of the case. If you are skillful in such matters, you might carry the padding and upholstery around the edge. This "puffiness’ might hold the board in place if you have a smallish collection. You will need to adjust the size of the board accordingly.
#4 Drill holes in board per your design.
Now it comes time to drill holds into the backer-board to hang your knives. Arrange your collection on the backer board and mark little dots where you will drill holes you will attach whatever you have decided to use to attach your knives. You will need to drill 3/16" holes -or thereabouts- for the screws you are going use to hold the little block / shelves for your folders. You will need to countersink them as well -so the screws lay flat to the back of the backer board. Same thing for the bolts that you will use to attach knobs if you are going in this direction. If you are using safety cotter pins, you will need to drill two rows of little tiny holes for the copper wire.
If you are using the notch and rotating tab to hold the board in place, now is the time to cut the notch. The next step is to upholster your board and this will obviously cover up one side or your holes. Not to worry. Get everything drilled or pierced or whatever.
5 Upholster the board.
If there is a woman in your life who does quilting and such like, your work is half done. If not -take your self off to a fabric store and be humble. If you have ever marveled at all the varieties of wood a craftsman has to choose from, prepare to be astounded. There are 10 times as many fabrics to choose from. Find a kind soul at the fabric store and ask for Dacron batting. Unless your backer board is huge and you collect broadswords, the thinnest batting will do you fine. Then ask her (and it's going to be a her) for advice in the area of faux leather, suede, ultra suede, or whatever. Do not be tempted to use leather, it's MUCH harder to work with. Also check out velvet, crushed velvet, or even burlap if you collection is particularly rustic. Spend a little time seeing what is available. Ask her if she thinks you ought to iron it before you put it down. Stretchy stuff probably doesn't need ironing. (Remarkable, really, that we have all seen all these fabrics at one time or another -but -I at least- have never noticed them as possible materials that you could actually make stuff out of. I think it's an X - Y chromosome thing.)
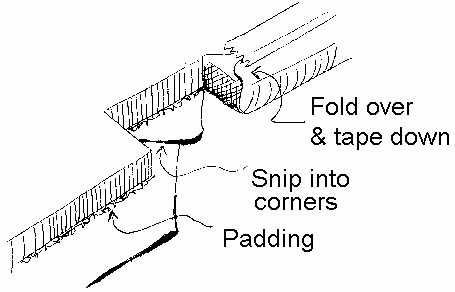
Back at your work table, cut a piece of the batting to the same size as your backer board. If you are terribly clever you might make it bigger and wrap the batting over with the covering fabric. While this may make the upholstery more luxurious, it is also likely to mess up your careful measuring and cutting. I just cut it to the same size as the board.. BUT you MUST cut the covering fabric about an inch or two bigger -in both directions- then your backer board. Now lay the fabric down -pretty side DOWN, and lay the batting down in the center. Lay your board down on top of it, and snip off the corners.
Do NOT cut closer then 1/4 to 3/8 inch from the board. If you have inside corners, snip into them. Then fold the fabric over the back of the board and attach it. If you are using a thin or soft backer board, tape the fabric down. If you are using something stouter, plywood for example, you can use a stapler. Don't worry about stretching it tight. A little softness is nice at this point. Being a wood worker, I tend to use carpenter's glue for a lot of things. (Sear-to-goodness -wood glue in blue jeans -cured with the iron, will hold cuffs in place for 2 or 3 washings.) Glue does a fine job of holding most fabrics to most kinds of board. You have to clamp it down while it dries, of course. This is what the masking tape does.
#6 Install hangers & shelves.
Your holes are all drilled through your backer board, so you are all done, right? Alas, not so. You still have to go through the fabric. While drilling or poking a hole through fabric is easy, it's also easy to snag, ravel, and otherwise -mess up the surrounding fabric. Here is what I do. I grab a finish nail with a vice grip and heat up the nail with a propane torch, but the stove will work fine. You don't need red hot to melt most of the synthetics. You don't need red-hot to get through natural fabrics either. Go slowly here. The right temperature will both pierce the fabric AND melt a nice little grommet around the hole. And all with no snags etc.
Once the fabric has holes, you are all set to bolt, screw, lace, or whatever all your knife-holding hardware into place.
#7 Attach case to wall.
You have to do this part right. If you don't know how -find someone who does. (Read my comments on Hiring Carpenters and Other Useful Things if you are just completely un-handy.) A case that holds a valuable collection of sharp things must not come down by accident. Wood screws into studs are ideal. If the studs prove uncooperative, a hollow wall anchor will carry a lot of weight IF it's put in correctly. Check out Hanging Things on the Wall CORRECTLY for advice in this direction.
#8 Put it all together.
The purpose of going to all the bother of a backer-board is to hide the screws you used to hang the case on the wall. So once the case is attached to the wall, you have only to put in the backer board and hang your knives. Or put the knives on the board and then put the board in the case. Don't forget the labels. Labels are the perfect finishing touch.
© Bill Harvey 2003