Hanging Things on the Wall CORRECTLY:
The RIGHT Way to Hang Things on the Wall: .
If you spend some time on a nice shadowbox, or put cherished collectibles in a display case, you MUST hang it on the wall correctly. Have you ever found some sort of nail -any damn sort of nail- and used the wrench or a big screwdriver to sort of bludgeon it into the wall and then hung a picture on it? Hung it after fiddling about trying to find the nail with the little toothed do-dad on the back of the picture? And then tried to get it to hang straight and stay that way? Everyone has. Not a bad way to hang calendars and pictures that are sort of light and more decorative then meaningful.
Bit this is NOT the way to go if you really care about a collection of some authority. I mean something like 13 signed baseballs, or WWI bayonets, or brass model railroad engines. Such things need to be put in a case and that case needs to be hung correctly. Here is how -and apologies if you have read my instructions before -they tend to be pretty detailed. This is for the folks that have never done such things at all and need all manner of advice. But even if you are pretty good at such things, you are apt to learn a thing or two here. Hang in.
STEP ONE: GET ORGANIZED
I'm a big fan of gathering everything you will need and approaching the job with planning and preparation. In my experience -the difference between a simple-job-well-began-&-promptly-finished.... and a cluster-f____ (Chinese-Fire-Drill / fiasco / Tim Taylor Miss-Adventure / call it what you will), is usually a mater of preparation. I will address the necessary tools and hardware shortly, but have you given thought to the less obvious -but equally important- things? Things like a ladder or step-stool if necessary. How about a helper? Maybe a spirit level if your eye is not adept at judging such things? (And if there is any doubt about your needing a level, YOU NEED ONE.) Don't underestimate the need for a refreshing beverage of some sort
You will obviously need what ever tools are necessary to drive / attach / screw-in / generally attach whatever fastening device you need -but the decision as to which to use is rather a loaded question and will be addressed anon.
STEP TWO: FIGURE OUT WHERE IT GOES
This part might involve a helper or spouse. You hold your display case up against the wall and someone else stands back and says things like, "No, a little to the right -no, too far, now up a little. More to the right" etc. Nothing to do but to do it. If you are working alone, this step is considerably simplified. You just put it where you like it -at something like your own eye level- and it's done. Once it's right -either via the committee method or the "This is my collection and I -by-Gosh- like it there-," make two little pencil marks. One somewhere under the case, -to indicate how high, and another one on one side or the other, -to indicate where one side of it goes.
Next thing is to figure out what is holding up this particular wall. Ordinarily it's wood two-by-fours. This is not profound, but the 2 x 4's are behind wallboard of some sort -and the guys that put up the wallboard worked very hard to make sure you will not be able to see the 2x4's. So how do you find them? Those little electronic sensor things work pretty well, but they aren't cheap. Knocking on the wall with your knuckles also works -most of the time. Here is a tip -outlets are always on one side or other of a stud. Find an outlet and knock on the wall to determine if the outlet is to the right or to the left of it. The wall will sound hollow on one side and more solid over the other. Measure over 16 inches and knock again. It will probably sound solid. If it sounds hollow, measure over 24" and then try. Some houses are built with the studs 24" apart -but the majority are built on 16" centers. You may have to measure several increments of 16" to get from the place you found the first stud till you get to the place on the wall where you want to hang the display case, but it's no big. Give you the chance to practice your multiplication tables (16", 32", 48", 64" etc.) Put a tiny little pencil mark on the wall where you think there’s a stud. Put it at about eye level. Easier to find it again this way and you will probably cover it up with the case.
Now study your pencil marks –especially the one on the side- with respect to the studs. A tape measure and a few more light (judicious) pencil marks might be appropriate. If you are hanging a tall narrow case and the stud falls more or less in the middle, you can get by with two fasteners, one high and one low. It it’s a wide case and falls on, (covers) two or more studs, two screws are appropriate –one on the left and one on the right. If it’s a big case and spans two or more studs, go with two high and two low. Simple enough.
The problem arises when one end of a wide case doesn't land on a stud. Or you find that when you have the case exactly where you want it, only one side lands on a stud. This is a job for hollow wall anchors –but more on this subject later.
STEP THREE: SELECT YOUR FASTENERS
The reason we spend so much time finding studs is simply because that studs are MUCH stronger then wall board. Easier too. The single nail you bludgeoned in will hold up a lot -even if it hits only drywall- because it is stressed, (pulled on) in only one direction -down. Screws and nails are very strong in this direction -engineering types calls this shear. But a display case, having some depth, will also stress the fasteners in tension . This means to pull in the direction of the fastener. You probably could pull out our hypothetical little nail with your fingers -particularly after it's been up for a while. The vibrations from your footsteps travel up the wall and loosen the nail. And if you live in an earthquake neighborhood? Fur'get aboud-it. So we need something that is strong in both shear and tension. A nail into studs works, but it a b---- to get out again. Screws are strong in both ways, and can be removed easily. A little more effort, you say? Yep, but in the long, run -we are doing things the RIGHT way, right?
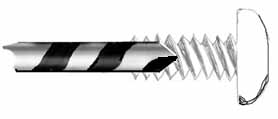
For those fasteners that go into studs, I feel the absolute best choice is a sheet-metal screw. This particular screw has threads up it's entire length and a big-old pan-shaped head. If you are making a trip to the hardware store, a #8 x 1 1/4" would be a good start for a small case. #10 x 1 1/2" would not be too big. If you are poking through a coffee-can from a dusty shelf in the garage that's full on odds and ends, you want something with course thread and a round head. If the head is too small, you also want to find a washer.
What about flat-head screws you ask? There are nice because they finish flush with the case-back. But in order to get them to finish flat -you need to countersink the hole. This makes the hole weaker and makes the whole she-bang weaker too. If you have a nice strong case back -plywood instead of hardboard- go ahead and counter-sink it & use flatheads. If you don't feel like schlepping down to the garage for a smear of paint, use Liquid Paper to hide the screw head.

Sheet-rock scresw are ubiquitious and dang usefull, but they are -after-all- flat head screws.
Otherwise, use the pan head or round head and cover them up with something from your collection.
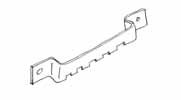
So much for the easy ones, the one with co-operative studs. What about the places with only dry-wall? For this you need hollow-wall anchors. Buy the ones that look like this...
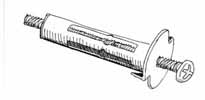 or this....
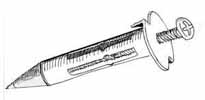
Some have a little (red) nose-cone that make them easier to drive into the wall, but this is not essential. What is essential, however, is paying attention to the package label and what it has to say about grip length. You need something that will work for 1/2 inch material.
There are all manner of new fan-dangled hollow wall hangers. Some of them undoubtedly work, but I am old and I like best what I know best.
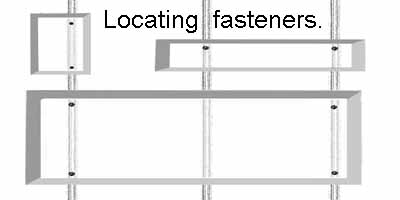
Do NOT waste your time or money on the little plastic ones that look like this.... 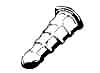 or this.
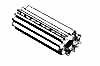
They seem to come with every Do-It-Yourself product that involves any sort of sticking it to the side of your house, but they are worthless for any thing but hanging things on brick walls.
STEP FOUR: START DRILLING & BANGING:
When you get back from the store or garage -or wherever you had to go to get fasteners, the hardest part of the job is done. You still have to do things right, so let’s take the simplest example first, -a tall narrow case and a single stud close to its center. Here is what to do.
1. Drive a nail into the wall where you think the center of the stud is. Use a small finish nail and be gentle. If it goes in too easily, you missed the stud. Move it ½ and inch to the right or the left and try again. If it still missed go ½ inch in the other direction. If you still get nothing, go out another ½ inch in each direction. If you have to go out much further then this, ether your knuckles are defective or your electronic stud finder needs a new battery. Stop and rethink things. If you do find wood –and the nail will let you know- don’t drive it in –pull it out. Then move the nail to the right or left ½ and inch and try again. What you are looking for now is the EDGE of the stud. When you know roughly where the edge of the stud is, you can figure where the center of the stud is, and this is much more useful then simply knowing that the stud is somewhere under your first nail hole. When you find the edge, back up ¾ inch and make a little mark. If you want to get fancy, make a vertical mark and then put a little circle around it. Ø this means center.
2. Now measure from this point to the mark you made to show the edge of the case when it’s where you want it.
3. Duplicate this measurement on the inside of the case -being sure to SUBTRACT FOR THE THICKNESS OF THE CASE SIDE. Make a little mark (maybe a neat little X) about 2 inches down from the top and 2 inched up from the bottom of the inside of the case.
4. Drill a hole through the back of the case. The size of the hole is a function of the type of fastener you are going to use. For the time being, use a 1/8" bit.
Now is a good time to have a helper because you are going to use one hand to hold up the case and the other hand to hold the level and get everything lined up and your third hand drill holes in your wall through the holes in your case.* Drill these holes with some authority. Drill through the sheet rock and into the underlying wood stud.
 Here is how to select the right bit: Hold both the bit and screw up to the light. You are looking for a drill bit that is smaller then the treads. If you are drilling into hard wood, you might want to go up a size. For sheetrock screws, for example, drill a hole with the same 1/8-inch bit.
5. Change the drill bit for a 3/16-inch bit. Now enlarge the holes on your case. You want the screw to pass through this hole easily. In this way, the little holes in the wall are perfectly co-centric with the holes in your case.
6. Change bits again –this time for a driver. Double check for location and level, and if everything is as it should be, go ahead and drive your screws. No need to overdo it, the screws are so strong, (in tension) that they can pull the back right off your case. All you need is for the case to fit neatly against the wall.
So far so good, but what about the situations where there is no stud in a co-operative location and you're using hollow-wall anchors? Most of what you do is the same as using a simple screw. Measure things, but measuring is not so important because you aren't counting on hitting a stud anyway. (Do a TLAR -That Looks About Right) Do this:
1. Drill smallish holes through the back of your box and then transfer these holes to your wall.
2. Change drill bits and enlarge the holes in your wall to 1/4". Don't worry that this seems a gosh-awful big hole -you will cover most of it up.
3. Now carefully drive the anchor into the hole. You just need to set the little teeth on the back of the flange into the sheetrock. You might give it an extra tap to get the flange to sit flush with the wall, but don't over-do it.
4. This next part is the tricky bit. You want to use your drill and driver to turn the screw till it deforms the anchor. You want to do this just enough. If you do it too much, you will break it and have to start all over again. How do you know when you are tight? Drive the screw slowly and feel for when it gets hard. Or listen for your drill slowing down. If you have a scrap of sheetrock handy, burn an anchor doing a practice run. This is probably the best solution -it will make you an instant expert. Once in a while, the little bolt on the end of the anchor breaks off for no good reason. You have to start all over again, -no way to salvage it.
5. Remove the screw -it's actually a bolt- and put it through a washer and then through the back of your case.
6. Hang it all on the wall. It's possible that you will have both regular screws and hollow-wall-anchors on the same case. Get everything ready before you start driving things in and it will go easily.
* There is actually an easy solution to this problem when you are working alone. Do this. Find your self a stick (a 1 x 2 for example), about as long as the case is wide. Start three nails in it –one at the center and one a few inches from each end. Line the stick up below your mark that indicates the height of the bottom of the case and drive the nail in. Put your level on the stick and adjust one end or the other up or down till the level is happy and drive that nail. Then drive the last nail. This makes for a temporary shelf to level and support the case while you are fiddling about.
It’s also useful to either put the drill in your pocket, or stick it through your belt like a pirate pistol. I'd be embarrassed to tell you the number of times I’ve gotten a thing all lined up and in place perfectly, and reached for my drill and found it just out of reach, and I’m supposed to be a pro.
© 2003 Bill Harvey