FRENCH LINING Drawers for Collectables:
Customizing your drawer cases with beautiful padded linings
that protect and highlight your collection is easier then you might
think.
You know those lovely drawer cases really expensive and delicate things come in? The ones where the little do-dads sit in their own little velvet pockets? My Dad, for example, had a leather case in his desk that held a beautiful old set of brass drafting tools, -each in its own cozy little green velvet bed. This is called French Lining, and usually applies to drawers. Ordinarily, this is done over a wooden framework that is actually upholstered with padding and a sewn fabric cover. Beautiful way to do things if you are very skilled or have lots of money to hire someone who is.
So you say you aren’t very skilled and don’t have money to burn, but you have a collection of beautiful X’s that deserve to be in a museum but are rolling around in the bottom of a drawer in an otherwise lovely drawer case? They are nice enough drawers as far as these things go, and it’s lined with tarnish cloth or acid free whatever,* but it’s not quite as beautiful as your X’s deserve. What to do?
Well bubbie, pay attention. What follows is a wonderful and user friendly method to French -Line your drawers that needs no power tools and can be done on the kitchen table, -and can probably be done with the tools you already have in your kitchen. The trick here is to make the linings out of florist’s foam. Real soft squishy Styrofoam-like stuff that you can easily sculpt to hold your collections of whatever. You then cover it with an elegant fabric of some sort. The first drawer liner might take you all of an hour. Once you get the knack of this technique, the rest will take no time at all. All this effort changes an old chest of drawers into a collector's drawer case to be proud of.
Read on.
Step One -SHOPPING:
 As is often the case in such matters, first step is to go shopping and gather up the stuff you need. But before you go, measure the inside of your drawers, length, width, and depth for each drawer ought to do it.
1. Begin at the fabric store. You want something elegant, limp, and stretchy. Have a look at crushed panne velvet -preferably knit, but see what else the store has to offer. Get a lot of it. I’m not sure just why, but estimating the amount of fabric needed is a whole lot different then buying wood, -seems to take a lot more of it then dimensions would indicate. About twice as much in my experience.*
2 Next you want to hit an art supply store: You want either spray mount -(it lets you reposition things after gluing them down) or spray-adhesive, -(this stuff is strong and by-god permanent and you better get it right the first time ‘cause you aren’t going to do any namby-pamby repositioning when you use adhesive.) A can of either is expensive, but lasts a long time and comes in handy for a lot of things-once you get used to it. If this particular store also does picture framing, have them cut you some pieces of cheap mat board that are 1/8 to 1/4 inch smaller then the inside of your drawers. Now you can do this yourself with whatever cardboard kind-a-stuff you have sitting around, but the framing guys can do it exactly, quickly, and probably cheaply. If you don’t have a reasonably new and a good size bottle of white glue at home, get one here. But the good stuff -wood glue, is going to be found at home stores etc. and is apt to be cheaper when you buy it by the quart, -and you will be needing a lot of it.
3. Your last stop is at a flower shop, and this is the brilliant bit. What you are after is florist’s foam. If you’ve never seen it, this foam is a real soft type of Styrofaom-foam, -you can stick you finger through 3 inches of it. And this is exactly why you are going to use for your collection. You are going to squish your delicate collectibles into the foam, and then use the glue to strengthen the foam. Probably you ought to plan to pay a buck or so for a block, but florists don’t usually compete on price. Here is a tip. Buy your significant other some flowers. This is a good idea for a number of reasons:
Probably been a long time since you have done such a thing, and
You are about to make a minor mess, and…You need to tactfully let the florist make a honest buck off you so they won’t gouge you on the price of the foam, -and they pay a lot less then $0.50 for a block of the stuff themselves.
Step Two -SLAB THE FOAM:
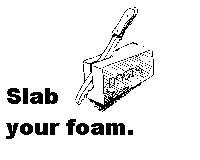 Home again and all over the kitchen table. Use a long bread knife to slab your foam. The thickness here is critical, but I have no specific suggestions. Say about half the drawer’s depth. Or half the thickness of your collection. If you have relatively thin things in your collection -you might make your slabs as thick as your items. Those bread knifes that are serrated on only one side tend to cut curved slabs, but they cut curved toast too. If you have a nice hand saw you like, -use it, but the stuff is so soft that a knife works fine. Put newspaper down, but the dust is so light that it’s going to blow all-over-the- place, -particularly if you use a saw. You might do this part outside, and did you pay attention when I said to buy some flowers?
I would suggest you have in the back of your mind the possibility that once you make a set of these liners, you will be inclined to re-do your first effort, -learning by doing being what it is and all. Make the first few linings one-at-a-time in any event.
Step Three -GLUE IT TO YOUR CARDBOARD:
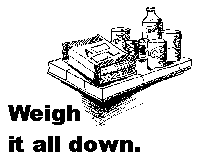
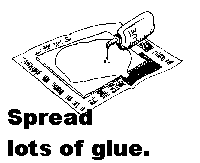 Now glue the foam blocks to the cardboard and use lots of glue. The foam will soak up the glue because that’s what it’s supposed to do, -or soak up water for the flowers as the case may be. It’s the glue that gives the foam its strength. You might find that you were a little inaccurate in your slabing. Don’t worry about it, -we will take care of it later. Weight it all down with books, canned food, small well-behaved children, whatever, and let it dry at least over night.
Step Four -ARRANGE YOUR COLLECTION:
While the glue is drying, do your display design. This is figuring out exactly where you want things to go. Use a ruler and make sketches if your collection has a lot of smallish items. Are you going to label the items? Then you need to allow area for the labels.
As to any unevenness of your slabs, there are two approaches. If it’s only one that is too high, you can slice it down to size. If there are a lot of them that are all different sizes, you can "sand" them down by turning the whole things up-side-down and rubbing it gently against the sidewalk or some other convenient -large -rough -FLAT -surface.
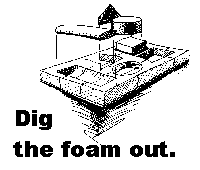 Now the fun part. If your collection is of relatively stout items, you can just sort of pound them into the foam. If they are fragile, you need to use a tea spoon or something to sort of excavate under them and then push them in gently. By going from excavating to squishing and back to excavating etc., you can make a perfect cavity for the most fragile item. Bear in mind that the fabric will add some thickness, so make your holes a little bigger and deeper then they first seem to need to be. When things seem right, drizzle glue all over the top. Let it soak in for a while -an hour or so, then drizzle more. Repeat as often as patience allows, particularly if you used a thick slab of foam. The hardest part is to leave it alone till it dries. Give it a few days. If you are tempted to stick your finger into it -to see how dry and how strong it is, please do so on the edge where it won’t show, because it’s not dry yet nor is it that strong. (The fabric provides a surprisingly large amount to the strength and durability.)
Step Five -INSTALL THE FABRIC:
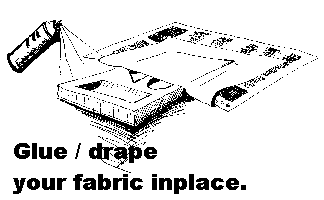 Once things are dry, you can start on the fabric. I suspect that those skills that make me such a skillful wood worker are the same things make me spectacularly ham-fisted and inept with fabric, but fiddling about with fabric is harder then it looks. Feel free to embellish any of my advice here, but my best suggestion is that you use a generous volume of cloth and let it sort of flow around your collection in a wrinkly and fluid manner. This actually lends an air of luxury and elegance. If your collectibles have particularly pointy or edgy parts, you may find you need to cut slits in the fabric to get the things down into the foam. If you do this right, and have selected a fairly stretchy knit fabric, these cuts won’t show. Fold back HALF the fabric, spray both the fabric and foam with your spray stuff, and drape the fabric back over it all. This might be a good time to have an extra pair of hands to help you get fabric all the way down into each pocket. Repeat for the other half, turn it upside-down, spray the underside of the original cardboard and the backside of the fabric, and wrap it all up on itself. Drop it all into the drawer, add your collection and you are done. Admire.
MORE POSSIBILITIES FOR FRENCH LININGS:
A few words need to be spent on real French lining, -made from wood even. If you have the patience and tools to cut a board or sheet of plywood, you probably know enough to get a good start. All I can add is to suggest is that you buy some blanket stuffing, Dacron is probably the best, when you are at the fabric store picking up your velvet or whatever.
Putting this down between your wood and fabric softens your corners and will save you some sanding or routing.
If wood seems just a little too hard to cut in one lifetime, Get the kind of foam that is used to insulate houses. It comes in all different thicknesses and will save you the bother of slabbing like you would need to do with the florist foam. Here is a tip, acetone -or lacquer thinner -or finger nail polish remover -both of which probably contain acetone, melt Styrofoam into nothingness. Cut your foam to match the size of your drawers or whatever, (and plan to mount it on cardboard like the florist's foam), lay out the shapes to match your collection etc., and just brush on a whiff of the acetone. Go slow till you get the hang of how much acetone melts how much Styrofoam, -if you have the good stuff, it will melt a LOT of foam. You will probably want to do a little hand work to make things just right. Cover it all with a single thin layer blanket stuffing and proceed with the velvet. Unlike the florists foam, however, your insulating foam is strong enough to forgo the need to drizzle glue all over everything.
* Lets be perfectly clear on this, -I have no idea of the acid-free’ness of any of the above. You are on your own here, but check out the UPPER MIDWEST CONSERVATION ASSOCIATION for more then you would ever want to know about acid free materials. Matt Woodside, curator of the San Mateo County History Museum, tells me that many museums use simple unbleached muslin. He also tells me that silver coins and brass items are particularly susceptible to damage from acid materials and the out-gassings of oak. Who knew? Finally, you might find value in my humble offerings: A Visit to the Fabric Store & / or Archival Materials
Also check out Adaptable Dividers for Drawers if your collection if changing and you need your drawer dividers that change as well, or Easy Home-Made Dividers if your collection doesn't change or you are not long on handy-man skills.
© 1998 Bill Harvey