Custom Display Cabinets, Part 1 -Design
Those things that you are the most proud of deserve to be displayed on the wall and need to be protected behind glass. The following combine an elegant do-it-yourself approach with an economic custom-built curio cabinet or display cases.

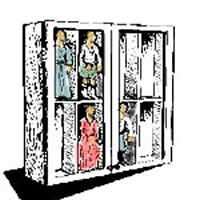
Folks are always asking me how they can to go about getting themselves permanent, wall mounted, earthquake-safe display cases for their collection of X. As I discuss this with people, we invariably come to the conclusion that what they want is, in essence, not so much display cases, but actually a bookcase. Perhaps a bookcase with very shallow shelves and lots of them, and perhaps one with standards (the vertical supports) that are rather closer together then the usual bookcase, and probably one with glass doors, but it comes down to their wanting a display case -bookcase, and wanting to know where and how to get one.
The best and only answer I have been able to come up with is.... to design and build the display case. Or have one built. The clever bit is to go to the local home-center-store and check out what they have by way of glass fronted kitchen cabinet doors. My thinking goes like this:
First, glass cabinet doors are hard (and expensive!) to make in the field, but quite reasonable when ordered from a factory.
Second, while a door is a door -glass or otherwise, the cabinet for your collection is considerably different from the one that holds your corn flakes. If nothign else, it's apt to be considerably shallower. All this prompts me to suggest you build your own case, (or have one built -check out Hiring Carpenters and other Useful Things, and order custom built -glass fronted doors.
The simplest approach is to simply build a big flat box with a back that is used to screw the whole thing to the wall. For instance, 1 x 4's or 1 x 6's oak boards, (to give you shelves 3 1/2 or 5 1/2 inch deep respectively), with a 1/8 inch hardboard back. Not quite as easy as it sounds, but not all that difficult either. You then mount your custom-built glass doors and you are in business.
We begin with the design stage. A good design and good preparations make the entire job go more easily. Also assures you will get exactly what you want. Permit me to outline the steps for a beginning woodworker. The more advanced craftsman may find some of my starting-out advice a little basic, but then again, he or she may get an idea or two that are helpful.
STEP 1 -RESEARCH!
Obviously, what you want to end up with will lead you to start with this material or that other material. But some of the decisions as to what you will make will be influenced by what you have available. Sort of a dilemma.
I would suggest you begin by reading these articles through at least once. If it doesn't make a lot of sense, not to worry, it will be more clear when you have seen what's what at the lumber yard, hardware store, or home improvement store. There is a Home-Depot just down the street from my shop, so I plan to model my advice on this sort of store. Point is that before the jumble of stuff at the store makes sense, you have to understand what you are looking at, and before you know what you are looking at, it has to make some small bit of sense. You get the idea. Ya' gots start somewhere. So here then, in roughly the order you need to follow, is what you need to know.
DOORS:
Can the local store order them for you in custom sizes? Absolutely custom sizes, or to the nearest inch? The nearest 1/8 inch? Or do they only come in the sizes to fit the cabinets and cupboards they carry? (It's not critical just what they offer, as long as you know how much latitude you have when you set things down at the 'ol drawing board.) Do you like the design? Is there a generous span of glass or is it mostly wood with a little strip of glass. (Often the wood frame is the same width through some range of door sizes. This is to say that a 2" frame the looks too wide & clumsy and doesn't show enough glass on a 12" x 18" door might look quite elegant on a 18" x 36" door.) Do they come finished and do you like the way it looks & feels? Are you apt to be able to duplicate the finish on the actual case itself? Is it necessary to do so? Ask about hinges. Pre-installed or extra? (More on hinges and hardware to follow.) You need this information -however it shakes out- when you design the case. Those things you can not change, you can adapt for with those things you can change. In this case, the case!
WOOD:
Every part of the country has a local favorite wood. Pecan, for example, is plentiful in parts of the south. Pine and fir in the west. Maple to-die-from around the Great Lakes. You can certainly get any species of wood anywhere if you are willing to pay for it, but there is much to be said for the home grown stuff. Go to whatever lumber/builder’s store is handy and get a feel for what sorts of wood is available in your area, and what it costs. Starting with the lowest common denominator and working up:
PINE: Very soft and easy to work if you don't have power tools but it's week and difficult to finish nicely. It’s not all that cheap either.
FIR: (Douglas Fir for instance) is related to pine, but much tougher and -in my humble opinion- much under-rated for such work. It finishes better then pine, but can still be tricky. If you plan to paint your case, consider fir or....POPLAR: This wood is also a relatively soft wood, -related to cottonwood- but great for painting.
OAK: My favorite wood. It's tough, finishes beautifully, reliable to cut and sand, but it wants power tools, -it's too hard to work by hand. It's commonly available, and reasonably priced for what you are getting, and what you are getting is wood that -if worked with respect and patience- can become an heirloom.
WALNUT, CHERRY and MAPLE: Each of these are beautiful hardwoods not unlike oak, but not as easy to find, -particularly at the local home-improvement store.. You may find though, that having taken the effort to find a place that carries these woods, that their prices are not that much more than the more ordinary wood. If you can find a good old boy who knows is stuff -ask him (or her) how each finishes.
HARDWOOD PLYWOOD: This is commonly available, and economical once you cut it into "boards", but it is still plywood after all. This means you will need to use careful joinery and deal with the edges. Iron-on edging is easy to use and serves to camouflage plywood as real boards. Or you could just ignore the edges. They don't show when the doors are closed after all.
PARTICLE BOARD: My last suggestion of material is rather controversial. You can buy a sheet of and rip it into planks and boards of any width. Particle board is much maligned, but I make a lot of cases out of the stuff. It's cheaper, and more dimensionally stable then anything else you can find and it dadoes and rabbits nicely. It needs to be painted, rather then stained, but a carefully prepared and painted case behind a nice hardwood and glass door is suitable for many homes & collections.
If you choose to line the inside of the case with fabric -the absolute last word in elegance- particle board is particularly appropriate. If you decide to rip boards out of either plywood of particle board you need to do careful joinery. Butt and biskit joints are problematic and dovetails are overkill. Both of these materials are less stiff then boards, so be careful to drive nails or screws in through the back to prevent sagging.
HARDWARE:
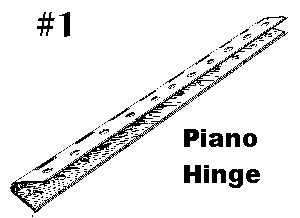
Have a close look at my drawings of various hinges. We all use hinges 100's of times a day and take them for granted. We can take them for granted only when they are installed correctly. The simplest hinge is the leaf hinge -two flat leafs wrapped around a pin. You take a leaf hinge and stretch it out 4 or 5 feet and you have a "piano" hinge.

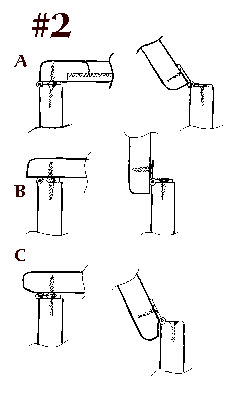
For it's size, the piano hinge is one of the strongest hinges going and I use a lot of them. You cut them to the length you need with a hack saw and touch-up the rough end with a file. I'd suggest you have a close look at a 3/4 inch by 4 or 5 foot hinge and keep it in the back of your mind as you consider drawing #2. These are cross sectional views of the various ways to install a leaf hinge -be it a piano hinge or a pair of simple 89 cent fixed-pin hinges.
 #2 A. This is the simplest way to install a hinge. The door is made at the same size as the case to which it mounts and opens 180 degrees or more. The downside is that the hinge shows as does all of the edge of the case.
B. Here is a slightly more elegant approach. The door is made larger, (1/2 inch lip extending beyond the case on all sides.) This hides the hinge and diminishes the visual weight of the case by partially hiding it. It also puts more glass over your collection. The downside here is that you can not open your case more them 90 degrees. and you can't use 2 doors on a single case, nor put 2 cases together without making some dimensional adjustments.
C. This installation is like B, but allows the doors to open a little wider. This is a nice touch on display cases that are mounted to the wall, but absolutely essential on cases that lay flat. The shape in the back of the door's lip (and it need only be on the hinge side), is called a 'relief' and can be easily done with a hand-plane or belt sander.
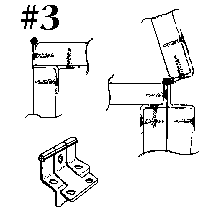
 #3. I use hinges like these for the doors on display cases that line up back-to-back. They are not as strong and simple as piano hinges, and they harder to find and tricky to install, but as you can see from the drawing, they work better in close quarters, -or when doors that are back to back.
 EUROPEAN HINGES. This is the last word in sophisticated hinges. The good news: they are completely concealed when closed, self closing, and best of all, they allow display cases to abut one another back-to-back like #3 above. The bad news: They are very expensive and must, absolutely MUST be installed correctly. They take up a lot of room on both the door and the case. The door side of the installation takes specialized tools and this suggests that you may be able to get your doors made with the hinges in place, but you had better know exactly what you are doing when you attach the hinges to the case, (or find someone who does.)
CATCHES: The last bit of research you need to do in the home center store is (probably) in the same aisle as the hinges. Check out knobs and catches. Knobs are pretty simple to install and much a matter of taste. Get what ever appeals. Catches on the other hand, need a word or two. The old fashioned magnetic catches work well, but are large and ugly. Much the same could be said for the roller type. I like the hidden magnetic type. They are sometimes hard to find and a little harder to install, but worth the effort. Remember, European hinges are self closing and don't need catches, but some little felt stick-on dot cushion things might be useful,. In fact, you might find them useful elsewhere about the home. These dots come 50 to a card and are probably hanging next to the knobs in the hardware aisle.
STEP 2 -DESIGN:
With some sort of wood in mind, some insight about hinges etc, and a clear idea of how the doors come together, you can begin to design your display cases. Start by arranging your collection as it might go on the wall, -say by spreading it all out on a bed. Have a tape measure and some graph paper handy. Draw pictures. Draw some more pictures. When you have your design figured out, draw yet more pictures, particularly if you are building it yourself. If you are having a pro do it, you need a dimensioned sketch. If you are making your own sawdust, you need to figure the dimensions of every single piece, and don’t forget to allow for the thickness of your boards. Figure 3/4" for 1x, ("one -by" stock and check your subtraction. If you are about to head off to the lumber store, draw yet one more picture, develop your cut list, and recheck your math.
Depending on how heavy and how deep your items are, you want to make a decision as to how deep you want the shelves to be. Much deeper than 1 x 6’s and you had better plan to spend quite a bit more money for select lumber (or make it out of plywood with veneer edge banding) and plan the structure and joinery very carefully. Perhaps you will decide you want it to rest on the floor, rather then to simply have it hang from the wall. PLEASE TAKE CARE TO HANG IT FROM THE WALL WITH GOOD HARDWARE, CAREFUL CRAFTSMANSHIP, AND INTO STUDS, NOT DRYWALL. Have a look at The RIGHT way to Hang Things on the Wall if you are the least bit unclear on this.
© 1998 Bill Harvey